读保护(RDP)
Introduction
Arm TrustZone technology enables the system and the software to be partitioned into Secure and Normal worlds. Secure software can access both Secure and Non-secure memories and resources, while Normal software can only access Non-secure memories and resources. Users can refer to ARM’s documents for more information about TrustZone.
Read Protection (RDP) is used to protect security-critical code, which is implemented with Arm TrustZone technology. The security-critical code (KM4 secure image) is stored in the Flash with encrypted form. It would be decrypted in secure bootloader and loaded into secure SRAM protected by TrustZone. The key for decryption is stored in OTP, and can be accessed only by Secure IPsec (IPSEC-S).


RDP Encryption: configure KM4 secure image manifest (named
manifest.json) to generate RDP image encrypted by AES-CBC.Flash Encrypt Area: used to store encrypted RDP image. The address field in image header gives the secure address to be loaded to.
RAM Secure Area: defined by users with TrustZone MPC entries.
IPSEC-S: RDP image will be decrypted and DMA to RAM Secure Area safely using Secure IPsec when boot. IPSEC-S is designed to be able to access TrustZone Secure World.
RDP Key: stored in OTP security zone. After program R/W protection bits, RDP key can be accessed only by IPSEC-S. Security boot code will fetch this key from OTP and load it into IPSEC-S for decryption.
Boot FLow
When RDP is enabled, the boot flow of the system is as follows:
Boot from secure ROM, then jump to Secure bootloader to execute. Next steps are performed in Secure RAM.
Software triggers hardware to auto-load RDP Key from OTP to IPSEC-S.
Software reads parts of the encrypted image from Flash into the buffer.
IPSEC-S decrypts data in buffer and DMA into Secure RAM.
RDP OTP
Name |
Address |
Size |
Description |
|---|---|---|---|
RDP_EN_PHY |
Physical 0x368[5] |
1 bit |
When either of these two bits is programmed, RDP is enabled.
When the device is in the development or debugging stage, it is recommended to
program the
RDP_EN_LOG bit, which can be disabled afterward. When the device is in the MP stage,it is recommended to program the RDP_EN_PHY bit to enable RDP permanently.
|
RDP_EN_LOG |
Logical 0x3[4] |
1 bit |
When either of these two bits is programmed, RDP is enabled.
When the device is in the development or debugging stage, it is recommended to
program the
RDP_EN_LOG bit, which can be disabled afterward. When the device is in the MP stage,it is recommended to program the
RDP_EN_PHY bit to enable RDP permanently. |
S_IPSEC_Key1 (RDP) |
Physical 0x200 ~ 0x21F |
32 bytes |
Used to store RDP key.
For example, the RDP key is [11223344556677889900aabbccddeeff11223344556677889900aabbccddeeff],
value 0x11 needs to be programmed into eFuse 0x200, 0x22 into 0x201, and so on.
|
S_IPSEC_Key1_R_Protection_EN |
Physical 0x365[3] |
1 bit |
When programmed, |
S_IPSEC_Key1_W_Forbidden_EN |
Physical 0x365[4] |
1 bit |
When programmed, |
How to Use RDP
小心
In order to simplify the operation steps, when in the device-development stage, both Step 3 and RDP key programming in Step 1 can be skipped, which means that the RDP image would be stored in plaintext and bootloader would not decrypt it. This method should be used only in device-development stage!
Carefully use the
efuse wrawcommand, and it cannot be changed once written. Do not power off or reset during writing!
The following steps illustrate how to enable RDP.
Program RDP-related OTP bits after the system boots up.
RDP enable bit
When in the device-development stage, it is recommended to program RDP_EN_LOG bit, which can be disabled afterward. Use efuse rmap first to check value in 0x3, then enable RDP_EN_LOG bit (0x3[4]).
efuse rmap

efuse wmap 0x3 1 f0
When in the device-MP stage, the RDP_EN_PHY bit should be programmed to enable RDP permanently.
efuse rraw

efuse wraw 0x368 1 DF
When in the device-development stage, it is recommended to program RDP_EN_LOG bit, which can be disabled afterward. Use efuse rmap first to check value in 0x3, then enable RDP_EN_LOG bit (0x3[4]).
efuse rmap

efuse wmap 0x3 1 10
When in the device-MP stage, the RDP_EN_PHY bit should be programmed to enable RDP permanently.
efuse rraw

efuse wraw 0x368 1 DF
When in the device-development stage, it is recommended to program RDP_EN_LOG bit, which can be disabled afterward. Use efuse rmap first to check value in 0x3, then enable RDP_EN_LOG bit (0x3[4]).
efuse rmap
efuse wmap 0x3 1 10
When in the device-MP stage, the RDP_EN_PHY bit should be programmed to enable RDP permanently.
efuse rraw
efuse wraw 0x368 1 DF
When in the device-development stage, it is recommended to program RDP_EN_LOG bit, which can be disabled afterward. Use efuse rmap first to check value in 0x3, then enable RDP_EN_LOG bit (0x3[4]).
efuse rmap

EFUSE[000]: ff ff 21 a0 ff ff ff ff ff ff ff ff ff ff ff ff
EFUSE[010]: ff ff ff ff ff ff ff ff ff ff ff ff ff ff ff ff
EFUSE[020]: 02 01 01 01 00 00 02 02 00 00 fd ff ff ff ff ff
EFUSE[030]: ff ff 05 06 09 0a 0b 09 07 06 02 03 00 00 02 01

efuse wmap 0x3 1 b0
When in the device-MP stage, the RDP_EN_PHY bit should be programmed to enable RDP permanently.
efuse rraw

RawMap[350]: ff ff ff ff ff ff ff ff ff ff ff ff ff ff ff ff
RawMap[360]: ff ff ff ff ff ff ff ff ff ff ff ff ff ff ff ff
RawMap[370]: ff ff ff ff ff ff ff ff ff ff ff ff ff ff ff ff
RawMap[380]: ff ff ff ff ff ff ff ff ff ff ff ff ff ff ff ff

efuse wraw 0x368 1 DF
RDP key
When in the device-MP stage, RDP key must be programmed. Using the following command to program RDP key:
efuse wraw 0x200 0x20 11223344556677889900aabbccddeeff11223344556677889900aabbccddeeff
RDP key length must be 32 bytes. Key value is defined by users, here we take this for example.
Other security-related bits
For MP devices, some security-related bits should also be programmed for security reasons, such as key read/write protection bits, S_IPSEC_Key1_R_Protection_EN/S_IPSEC_Key1_W_Forbidden_EN bits, etc.
Enable TrustZone in SDK
{SDK}\amebaxxx_gcc_project:Modify KM4 secure image manifest configuration
The KM4 secure image manifest configuration file is
{SDK}\amebadxxx_gcc_project\manifest.json.Set RDP_EN to 1.
Fill in RDP_IV, which must be 8 bytes, another 8 byte is RSIP_IV in app section.
Fill in RDP_KEY, which must be 32 bytes and equal to the key programmed into OTP in Step 1.
"//": "cert/app share IMG_ID/IMG_VER, rdp img is in app",
"app":
{
   "IMG_ID": "1",
   "IMG_VER_MAJOR": 1,
   "IMG_VER_MINOR": 1,
   "SEC_EPOCH": 1,

   "HASH_ALG": "sha256",

   "RSIP_IV": "213253647586a7b8",
},

"SECURE_BOOT_EN": 0,
"//": "HASH_ALG: sha256/sha384/sha512/hmac256/hmac384/hmac512, hamc need key",
"HMAC_KEY": "9874918301909234686574856692873911223344556677889900aabbccddeeff",

"RSIP_EN": 0,
"//": "RSIP_MODE: 1 is XTS(CTR+ECB), 0 is CTR",
"RSIP_MODE": 1,
"ECB_KEY": "E2A0D6500BBF1DD8DC212098C230EB731ECE3A81AA11D0E6E538FA36BBA4FF6E",
"CTR_KEY": "6AA34203018334474B25A0600996CA0968AA6228B886FF234B4EB9628B703C0A",

"//": "Actual RDP IV is 16Byte which is composed by app RSIP_IV[7:0] + RDP_IV[15:8]",
"RDP_EN": 0,
"RDP_IV": "0123456789abcdef",
"RDP_KEY": "11223344556677889900aabbccddeeff11223344556677889900aabbccddeeff"
Rebuild the project using
maketo generate encrypted KM4 secure image automatically in the following table, then download them into Flash.Project
Encrypted image
Download address
km4_bootloader
km4_boot_all.bin
0x0800_0000
cert.bin
km0_km4_app.bin
0x0801_4000
km0_application
km0_km4_app.bin
0x0801_4000
km4_application (non-secure)
km0_km4_app.bin
0x0801_4000
km4 secure image
km0_km4_app.bin
0x0801_4000
Project
Encrypted image
Download address
km4_bootloader
km4_boot_all.bin
0x0800_0000
cert.bin
kr4_km4_app.bin
0x0801_4000
kr4_application
km4_application (non-secure)
km4 secure image
Project
Encrypted image
Download address
km4_bootloader
km4_boot_all.bin
0x0800_0000
cert.bin
kr4_km4_app.bin
0x0801_4000
kr4_application
km4_application (non-secure)
km4 secure image
Project
Encrypted image
Download address
km4_bootloader
km4_boot_all.bin
0x0800_0000
cert.bin
km0_km4_ca32_app.bin
0x0802_0000
km0_application
km4_application (non-secure)
km4 secure image
ca32_application
Reset the board.
When the RDP image is loaded successfully, you can see the following logs:
ROM:[V1.0]
FLASH RATE:1, Pinmux:1
IMG1(OTA1) VALID, ret: 0
IMG1 ENTRY[3000ad39:0]
[KM4] [MODULE_BOOT-LEVEL_INFO]:IMG1 ENTER MSP:[30009fe4]
[KM4] [MODULE_BOOT-LEVEL_INFO]:IMG1 SECURE STATE: 1
[KM4] [MODULE_BOOT-LEVEL_INFO]:Flash ID: c8-65-17
[KM4] [MODULE_BOOT-LEVEL_INFO]:Flash Read 4IO
[KM4] FLASH HandShake[0x1 OK]
[KM4] [MODULE_BOOT-LEVEL_INFO]:KM0 XIP IMG[0c000000:5020]
[KM4] [MODULE_BOOT-LEVEL_INFO]:KM0 SRAM[20040000:da0]
[KM4] [MODULE_BOOT-LEVEL_INFO]:KM0 PSRAM[0c005dc0:20]
[KM4] [MODULE_BOOT-LEVEL_INFO]:KM0 BOOT[20004d00:40]
[KM4] [MODULE_BOOT-LEVEL_INFO]:KM4 XIP IMG[0e000000:6d60]
[KM4] [MODULE_BOOT-LEVEL_INFO]:KM4 SRAM[20010000:60]
[KM4] [MODULE_BOOT-LEVEL_INFO]:KM4 PSRAM[0e006dc0:20]
[KM4] [MODULE_BOOT-LEVEL_INFO]:IMG2 BOOT from OTA 1
[KM4] [MODULE_BOOT-LEVEL_INFO]:RDP EN
[KM4] [MODULE_BOOT-LEVEL_INFO]:DEC KM4 IMG3[30075000:5a0]
[KM4] [MODULE_BOOT-LEVEL_INFO]:DEC KM4 NSC[20070000:1320]
[KM4] [MODULE_BOOT-LEVEL_INFO]:IMG3 BOOT from OTA 0
[KM4] [MODULE_BOOT-LEVEL_INFO]:Start NonSecure @ 0xe000115 ...
[KM0] [MODULE_BOOT-LEVEL_INFO]:KM0 BOOT UP
[KM4] [MODULE_BOOT-LEVEL_INFO]:VTOR: 20005000, VTOR_NS:0
[KM0] [MODULE_BOOT-LEVEL_INFO]:KM0 APP_START
[KM4] [MODULE_BOOT-LEVEL_INFO]:KM4 APP START
[KM0] [MODULE_BOOT-LEVEL_INFO]:KM0 CPU CLK: 40000000 Hz
[KM4] [MODULE_BOOT-LEVEL_INFO]:IMG2 SECURE STATE: 0
[KM0] [MODULE_BOOT-LEVEL_INFO]:KM0 VTOR:0x20000000
[KM4] [MODULE_BOOT-LEVEL_INFO]:BOOT_IMG3: BSS [30075590~30076da8] SEC: 1
[KM4] [MODULE_BOOT-LEVEL_INFO]:KM4 BOOT REASON: 0
[KM0] [MODULE_PMC-LEVEL_INFO]:AP wake event 410 80000008
[KM4] [MODULE_BOOT-LEVEL_INFO]:KM4 CPU CLK: 200000000 Hz
[KM0] [MODULE_PMC-LEVEL_INFO]:NP wake event 804 41008308
[KM0] [MODULE_BOOT-LEVEL_INFO]:KM0 OS START
[KM4] [CAL131K]: delta:20 target:2441 PPM: 8193 PPM_Limit:30000
[KM4] [CAL4M]: delta:1 target:320 PPM: 3125 PPM_Limit:30000
[KM4] [MODULE_BOOT-LEVEL_INFO]:KM4 MAIN
[KM4] [MODULE_BOOT-LEVEL_INFO]:KM4 START SCHEDULER
When the RDP image is loaded successfully, you can see the following logs:
[BOOT-I] IMG1 SECURE STATE: 1
[FLASH-I] Flash ID:ef-70-17
[FLASH-I] Flash Read 4IO
[FLASH-I] FLASH Handshake[0x2 OK]
[BOOT-I] PMC_CORE ROLE:0 (0 represents AP2NP), NP: 1 (1 represents KR4 is NP)
[BOOT-I] IMG2 OTF EN
[BOOT-I] KR4 XIP IMG[0c000000:630e0]
[BOOT-I] KR4 PSRAM[0c0630e0:20]
[BOOT-I] KR4 SRAM[20068000:d44]
[BOOT-I] KR4 BOOT[20004c00:40]
[BOOT-I] KR4 PMC[20005500:3e0]
[BOOT-I] IMG2 OTF EN
[BOOT-I] KM4 XIP IMG[0e000000:579e0]
[BOOT-I] KM4 PSRAM[0e0579e0:20]
[BOOT-I] KM4 SRAM[2001b000:fe0]
[BOOT-I] KM4 BOOT[20005fc0:40]
[BOOT-I] KM4 PMC[20005900:3e0]
[BOOT-I] RDP EN
[BOOT-I] KM4 IMG3[30010000:620]
[BOOT-I] KM4 NSC[2000b000:1320]
[BOOT-I] IMG2 VERIFY PASS
[BOOT-I] IMG2 BOOT from OTA 1, Version: 1.1
[B00T-I] Start IMG2 @ 0xe00165d ...
[APP-I] KM4 APP START
[[APP-I]M AINV-TORI:]  KR4 OS START
20005000, VTOR_NS:0
[APP-I] IMG2 SECURE STATE: O
[BOOT-I] B00T_IMG3: BSS[30010620~30011e68] SEC: 1
[CLK-I] [CAL131K]: delta:3 target:2441 PPM: 1229 PPM_Limit:30000
[CLK-I] [CAL4M]: delta:0 target:320 PPM: 0 PPM_Limit:30000
[MAIN-I] KM4 MAIN
[MAIN-I] File System Init Success
[PMC-I] SYSPMC_OPT 200000
[PMC-I] AP wake event 200040 0
When the RDP image is loaded successfully, you can see the following logs:
ROM:[V1.0]
FLASHRATE:1
BOOT FROM NOR
IMG1 ENTRY[30004a79:0]
[MODULE_BOOT-LEVEL_INFO]:IMG1 ENTER MSP:[30002fdc]
[MODULE_BOOT-LEVEL_INFO]:IMG1 SECURE STATE: 1
[MODULE_BOOT-LEVEL_INFO]:Flash ID: c2-28-16
[MODULE_BOOT-LEVEL_INFO]:Flash Read 4IO
[MODULE_BOOT-LEVEL_INFO]:Init PSRAM
[MODULE_BOOT-LEVEL_INFO]:KM0 XIP IMG[0c000000:4140]
[MODULE_BOOT-LEVEL_INFO]:KM0 DATA[23002000:14e0]
[MODULE_BOOT-LEVEL_INFO]:KM4 XIP IMG[0c000000:20]
[MODULE_BOOT-LEVEL_INFO]:KM4 DATA[600c0000:4d60]
[MODULE_BOOT-LEVEL_INFO]:RDP EN
[MODULE_BOOT-LEVEL_INFO]:KM4 IMG3[702a0000:1730]
[MODULE_BOOT-LEVEL_INFO]:KM4 NSC[6029b000:14e0]
[MODULE_BOOT-LEVEL_INFO]:Start NonSecure @ 0x600c010c ...
[MODULE_BOOT-LEVEL_INFO]:VTOR: 2001d000, VTOR_NS:0
[MODULE_BOOT-LEVEL_INFO]:KM4 APP START
[MODULE_BOOT-LEVEL_INFO]:IMG2 SECURE STATE: 0
[MODULE_BOOT-LEVEL_INFO]:BOOT_IMG3: BSS [702a1730~702a2f48] SEC: 1
[MODULE_BOOT-LEVEL_INFO]:KM0 VTOR:0x23000000
[MODULE_BOOT-LEVEL_INFO]:KM4 START SCHEDULER
[MODULE_BOOT-LEVEL_INFO]:KM0 OS START
备注
The RDP function would not check the authentication of the image. In order to avoid the image being tampering, secure boot function should be used to authenticate it. Refer to Secure Boot .
RDP Demo
The RDP demo is located in {SDK}\component\example\peripheral\raw\RDP\src, containing two source files:
secure_src.c: Secure code protected by TrustZone. Only those Non-Secure Callable (NSC) functions (with IMAGE3_ENTRY_SECTION and NS_ENTRY attribute prefix) can be called by non-secure code.main.c: Non-secure code, which cannot call most of the secure functions besides NSC functions.
We have two examples in the demo to show how to call secure functions from non-secure code, and how to call non-secure functions from secure code. Users can refer this demo to add codes and generate RDP image.
Call secure function from non-secure code (
secure_src.c): Use cmse_nonsecure_call (defined as NS_ENTRY macro) attribute to make rdp_protection_entry available for non-secure code.
Call non-secure function from secure code (
secure_src.c):Use cmse_nonsecure_call attribute to declare a non-secure function pointer in secure code.
Use cmse_nsfptr_create macro to transfer a non-secure function pointer, then secure code can call this non-secure function.

Call secure function from non-secure code (
secure_src.c): Use cmse_nonsecure_call (defined as NS_ENTRY macro) attribute to make rdp_protection_entry available for non-secure code.

Call non-secure function from secure code (
secure_src.c):Use cmse_nonsecure_cal attribute to declare a non-secure function pointer in secure code.
Use cmse_nsfptr_create macro to transfer a non-secure function pointer, then secure code can call this non-secure function.

Call secure function from non-secure code (
secure_src.c): Use cmse_nonsecure_call (defined as NS_ENTRY macro) attribute to make rdp_protection_entry available for non-secure code.
Call non-secure function from secure code (
secure_src.c):Use cmse_nonsecure_cal attribute to declare a non-secure function pointer in secure code.
Use cmse_nsfptr_create macro to transfer a non-secure function pointer, then secure code can call this non-secure function.
Call secure function from non-secure code (
main.c): Usecmse_nonsecure_call(defined asNS_ENTRYmacro) attribute to makerdp_protection_entryavailable for non-secure code.

Call non-secure function from secure code (
secure_src.c):Use cmse_nonsecure_call attribute to declare a non-secure function pointer in secure code.
Use cmse_nsfptr_create macro to transfer a non-secure function pointer, then secure code can call this non-secure function.

小心
Tasks that are created by calling
xTaskCreate()have no secure process stack by default. But secure code execution needs secure stack. In order to call NSC functions successfully, the task must callportALLOCATE_SECURE_CONTEXT()to allocate itself a secure stack before it calls any secure functions.Here is an example of a task that would call NSC functions later. The task function is
shell_task_ram(). At the beginning of the function,portALLOCATE_SECURE_CONTEXT()is called to allocate a secure stack.
static void shell_task_ram(void *Data)
{
   /* To avoid gcc warnings */
   (void) Data;
   u32 ret = FALSE;
   PUART_LOG_BUF pUartLogBuf = shell_ctl.pTmpLogBuf;

   //4 Set this for UartLog check cmd history
   shell_ctl.shell_task_rdy = 1;

   portALLOCATE_SECURE_CONTEXT(configMINIMAL_SECURE_STACK_SIZE);

   do {
      xSemaphoreTake(shell_sema, RTOS_MAX_DELAY);

      shell_loguartRx_dispatch();

      // ......
   }
   // ......
}
To build this demo, follow these steps:
Copy
main.cto{SDK}\amebaxxx_gcc_project\project_km4\srcand override the original one.Copy
secure_src.cto{SDK}\component\soc\amebaxxx\img3and override the original one.Change Boot_Log_En from FALSE to TRUE in
ameba_bootcfg.c.Follow the steps in Section RDP OTP to generate and download RDP image.
Reset the device.
When boot is successful, the rdp call succeed! would be printed in the boot log.
How to Adjust TrustZone Secure Area Size
The following figure shows the secure/non-secure memory layout for KM4 application.
When RDP is disabled, the memory range of 0x6000_0000~0x6001_0000 is all non-secure and would be used by non-secure world.
When RDP is enabled, the memory range of 0x6000_0000~0x6001_0000 is secure and used by KM4 secure image (RDP image). This area is called TrustZone Secure Area, which is mentioned in Read Protection (RDP).
Memory area |
Description |
|---|---|
KM4_BD_RAM_TZ_NSC |
Stores Secure Gateway Veneers for NSC functions |
KM4_BD_RAM_TZ_ENTRY |
Stores NSC functions |
KM4_BD_RAM_TZ_S |
Stores secure functions which cannot be called by non-secure world |

To adjust the size of TrustZone Secure Area, use the following steps.
Config TF-M code location:
Switch to the directory:
{SDK}\amebadxxx_gcc_projectType command
make menuconfigand select in order
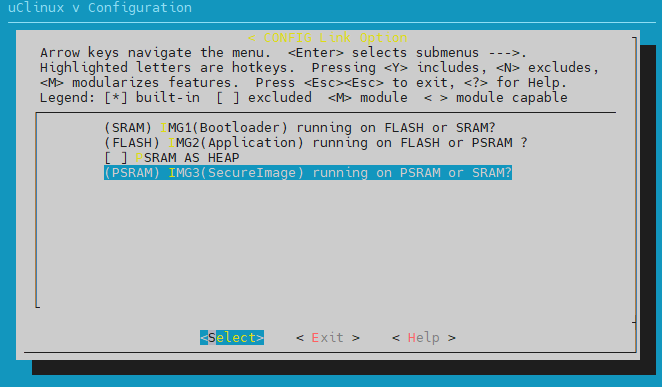
Adjust the size of TrustZone Secure Area by modify the flollowing macros (the total size of TZ_NSC_SIZE/TZ_ENTRY_SIZE/TZ_S_SIZE should be a multiple of 4KB).
/* layout configuration */
#define TZ_NSC_SIZE           (4)
#define TZ_ENTRY_SIZE         (16)
#define TZ_S_SIZE             (44)
The following figure shows the secure/non-secure memory layout for KM4 application.
When RDP is disabled, the memory range of 0x6000_0000~0x6001_0000 is all non-secure and would be used by non-secure world.
When RDP is enabled, the memory range of 0x6000_0000~0x6001_0000 is secure and used by KM4 secure image (RDP image). This area is called TrustZone Secure Area, which is mentioned in Read Protection (RDP).
Memory area |
Description |
|---|---|
KM4_BD_RAM_NSC |
Stores Secure Gateway Veneers for NSC functions |
KM4_BD_RAM_ENTRY |
Stores NSC functions |
KM4_BD_RAM_S |
Stores secure functions which cannot be called by non-secure world |

To adjust the size of TrustZone Secure Area, use the following steps.
Config TF-M code location:
Switch to the directory:
{SDK}\amebadxxx_gcc_projectType command
make menuconfigand select in order
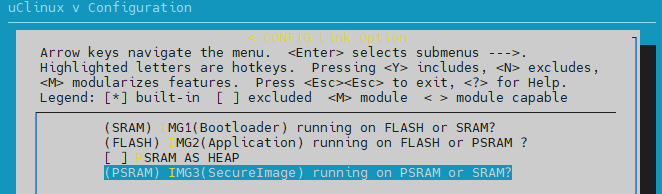
Adjust the size of TrustZone Secure Area by modify the flollowing macros (the total size of TZ_NSC_SIZE/TZ_ENTRY_SIZE/TZ_S_SIZE should be a multiple of 4KB).
/* layout configuration */
#define TZ_NSC_SIZE           (4)
#define TZ_ENTRY_SIZE         (16)
#define TZ_S_SIZE             (44)
The following figure shows the secure/non-secure memory layout for KM4 application.
When RDP is disabled, the memory range of 0x6000_0000~0x6001_0000 is all non-secure and would be used by non-secure world.
When RDP is enabled, the memory range of 0x6000_0000~0x6001_0000 is secure and used by KM4 secure image (RDP image). This area is called TrustZone Secure Area, which is mentioned in Read Protection (RDP).
Memory area |
Description |
|---|---|
KM4_BD_RAM_NSC |
Stores Secure Gateway Veneers for NSC functions |
KM4_BD_RAM_ENTRY |
Stores NSC functions |
KM4_BD_RAM_S |
Stores secure functions which cannot be called by non-secure world |
To adjust the size of TrustZone Secure Area, use the following steps.
Config TF-M code location:
Switch to the directory:
{SDK}\amebadxxx_gcc_projectType command
make menuconfigand select in order
Adjust the size of TrustZone Secure Area by modify the flollowing macros (the total size of TZ_NSC_SIZE/TZ_ENTRY_SIZE/TZ_S_SIZE should be a multiple of 4KB).
/* layout configuration */
#define TZ_NSC_SIZE           (4)
#define TZ_ENTRY_SIZE         (16)
#define TZ_S_SIZE             (44)
The following figure shows the secure/non-secure memory layout for KM4 application.
When RDP is disabled, the memory range of
0x6015_B000~0x6018_0000is non-secure and used by non-secure world.When RDP is enabled, the memory range of
0x6015_B000~0x6018_0000is secure and used by KM4 secure image (RDP image). This area is called TrustZone Secure Area, which is mentioned in Read Protection (RDP).
Memory area |
Description |
|---|---|
|
Stores Secure Gateway Veneers for NSC functions |
|
Stores NSC functions |
|
Stores secure functions which cannot be called by non-secure world |

To adjust the size of TrustZone Secure Area, the following files should be modified synchronously.
File |
Path |
Note |
|---|---|---|
amebasmart_layout.ld |
|
The start address of |
amebahp_boot_trustzonecfg.c |
|
Refer to TrustZone of User Manual for more details. |
/* KM4 Secure RAM, BIT(28)=1 */
KM4_ROMBSS_RAM_S (rw) :                 ORIGIN = 0x30000000, LENGTH = 0x30001000 - 0x30000000     /* KM4 ROM BSS RAM S: 4k */
KM4_MSP_RAM_S (rw) :                    ORIGIN = 0x30001000, LENGTH = 0x30003000 - 0x30001000     /* KM4 MSP_S RAM: 8k */
KM4_FLOADER_RAM_S (rwx) :               ORIGIN = 0x30003020, LENGTH = 0x3001B000 - 0x30003020     /* KM4 ImgTool Flash Loader RAM: 95k */
KM4_BOOTLOADER_RAM_S (rwx) :            ORIGIN = 0x30003020, LENGTH = 0x30014000 - 0x30003020     /* KM4 BOOT Loader RAM: 68k */
KM4_BD_RAM_NSC (rwx) :                  ORIGIN = 0x6015B020, LENGTH = 0x6015C000 - 0x6015B020     /* KM4 BD RAM NSC: 3k */
KM4_BD_RAM_ENTRY (rwx) :                ORIGIN = 0x6015C000, LENGTH = 0x60160000 - 0x6015C000     /* KM4 BD RAM ENTRY: 16k */
KM4_BD_RAM_S (rwx) :                    ORIGIN = 0x70160020, LENGTH = 0x70180000 - 0x70160020     /* KM4 BD RAM S: 127k */
BOOT_RAM_DATA_SECTION
const TZ_CFG_TypeDef sau_config[] = {
   {0x0001E000,         0x00054000 - 1,         0},       /* entry0: IROM & DROM NS */
   {0x08000000,         0x0A000000 - 1,         0},       /* entry1: BootLoader XIP */
#if defined (CONFIG_TRUSTZONE_EN) && (CONFIG_TRUSTZONE_EN == 1U)
   {0x0C000000,         0x6015B000 - 1,         0},       /* entry2: Others */
   {0x6015B000,         0x6015C000 - 1,         1},       /* entry3: NSC */
   {0x60160000,         0xFFFFFFFF,             0},       /* entry4: TODO */
#else
   {0x0C000000,         0xFFFFFFFF,             0},       /* entry2: Others */
   {0xFFFFFFFF,         0xFFFFFFFF,             0},       /* entry3: TODO */
   {0xFFFFFFFF,         0xFFFFFFFF,             0},       /* entry4: TODO */
#endif
   {0xFFFFFFFF,         0xFFFFFFFF,             0},       /* entry5: TODO */
   {0xFFFFFFFF,         0xFFFFFFFF,             0},       /* entry6: TODO */
   {0xFFFFFFFF,         0xFFFFFFFF,             0},       /* entry7: TODO */
};

BOOT_RAM_DATA_SECTION
const TZ_CFG_TypeDef mpc1_config[] =                                      /* Security configuration for DDR/PSRAM */
{
//  Start               End                     NSC
#if defined (CONFIG_TRUSTZONE_EN) && (CONFIG_TRUSTZONE_EN == 1U)
   {0x00000000,         0x0015B000 - 1,         0},       /* entry0: TODO */
#elif defined (CONFIG_XIP_FLASH)
   {0x00000000,         0x00060000 - 1,         0}, /* entry0: TODO */
#else
   {0x00000000,         0x00180000 - 1,         0},       /* entry0: TODO */
#endif
   /* FIP = BL2(256K)+BL32(1M)+BL33, [0x00600000, 0xFFFFFFFF] is safe for secure BL2/BL32 */
   {0x00600000,         0x0FFFFFFF,             0},       /* entry1: see above */
   {0xFFFFFFFF,         0xFFFFFFFF,             0},       /* entry2: TODO */
   {0xFFFFFFFF,         0xFFFFFFFF,             0},       /* entry3: TODO */
   {0xFFFFFFFF,         0xFFFFFFFF,             0},       /* entry4: TODO */
   {0xFFFFFFFF,         0xFFFFFFFF,             0},       /* entry5: TODO */
   {0xFFFFFFFF,         0xFFFFFFFF,             0},       /* entry6: TODO */
   {0xFFFFFFFF,         0xFFFFFFFF,             0},       /* entry7: locked to [CA32_BL3_DRAM_NS, 0x00600000 - 1] in ATF for security reason */
};
How to Configure the Security of a Slave Port
Calling TZ_ConfigSlaveSecurity() in secure project can set the security attribute of a slave port:
void TZ_ConfigSlaveSecurity(PPC_PeripheralId Perip, u32 Status)
When a slave port is configured as secure, its register can only be accessed from secure world, and non-secure world can’t read or write it.
When a slave port is configured as non-secure, its register can be accessed from both secure world and non-secure world.
备注
TZ_ConfigSlaveSecurity() can only be called from secure world.
The following peripherals can be configured directly through this API:
Peripherals |
Perip parameter |
|---|---|
WIFI_CFG |
SECFG_WIFI_CFG |
BT_CFG |
SECFG_BT_CFG |
SECURE_ENGINE |
SECFG_SECURE_ENGINE |
GDMA0_CFG |
SECFG_GDMA0_CFG |
PPE_CFG |
SECFG_PPE_CFG |
SDIO_CFG |
SECFG_SDIO_CFG |
SPI0 |
SECFG_SPI0 |
SPI1 |
SECFG_SPI1 |
PSRAM_PHY |
SECFG_PSRAM_PHY |
PSRAM_SPIC_USERMODE |
SECFG_PSRAM_SPIC_USERMODE |
SPIC_USERMODE |
SECFG_SPIC_USERMODE |
QSPI |
SECFG_QSPI |
SPORT0_I2S |
SECFG_SPORT0_I2S |
SPORT1_I2S |
SECFG_SPORT1_I2S |
OTPC_CFG |
SECFG_OTPC_CFG |
SYSON |
SECFG_SYSON |
UART0 |
SECFG_UART0 |
UART1 |
SECFG_UART1 |
UART2_BT |
SECFG_UART2_BT |
UART3_LOG |
SECFG_UART3_LOG |
GPIOA_B |
SECFG_GPIOA_B |
ADC |
SECFG_ADC |
CAP_TOUCH |
SECFG_CAP_TOUCH |
KEY_SCAN |
SECFG_KEY_SCAN |
IPC |
SECFG_IPC |
DBG_TIMER |
SECFG_DBG_TIMER |
PMC_TIMER_0_1 |
SECFG_PMC_TIMER_0_1 |
TIMER0_7_BASIC |
SECFG_TIMER0_7_BASIC |
TIMER8_9_PULSE_PWM_TIMER10_11 |
SECFG_TIMER8_9_PULSE_PWM_TIMER10_11 |
TRNG_PORT1_PORT2 |
SECFG_TRNG_PORT1_PORT2 |
RXI300 |
SECFG_RXI300 |
RSIP |
SECFG_RSIP |
LEDC |
SECFG_LEDC |
PDM |
SECFG_PDM |
IR |
SECFG_IR |
I2C0 |
SECFG_I2C0 |
I2C1 |
SECFG_I2C1 |
Calling TZ_ConfigSlaveSecurity() in secure project can set the security attribute of a slave port:
void TZ_ConfigSlaveSecurity(PPC_PeripheralId Perip, u32 Status)
When a slave port is configured as secure, its register can only be accessed from secure world, and non-secure world can’t read or write it.
When a slave port is configured as non-secure, its register can be accessed from both secure world and non-secure world.
备注
TZ_ConfigSlaveSecurity() can only be called from secure world.
The following peripherals can be configured directly through this API:
Peripherals |
Perip parameter |
|---|---|
PSRAM_USERMODE |
SECFG_PSRAM_USERMODE |
SPIC_USERMODE |
SECFG_SPIC _USERMODE |
BT_CFG |
SECFG_BT_CFG |
OTPC |
SECFG_OTPC |
PSRAM_PHY |
SECFG_PSRAM_PHY |
SYSON |
SECFG_SYSON |
RXI300 |
SECFG_RXI300 |
UART0 |
SECFG_UART0 |
UART1 |
SECFG_UART1 |
UART2 |
SECFG_UART2 |
UART3_BT |
SECFG_UART3_BT |
UART4_LOG |
SECFG_UART4_LOG |
LEDC |
SECFG_LEDC |
TRNG_PORT1_2 |
SECFG_TRNG_PORT1_2 |
AUDIO_CODEC |
SECFG_AUDIO_CODEC |
TIMER0_7_BASIC |
SECFG_TIMER0_7_BASIC |
TIMER8_14 |
SECFG_TIMER8_14 |
GPIOA_B |
SECFG_GPIOA_B |
RTC |
SECFG_RTC |
ADC_ADC_COMP |
SECFG_ADC_ADC_COMP |
THERMAL |
SECFG_THERMAL |
CAP_TOUCH |
SECFG_CAP_TOUCH |
WDG |
SECFG_WDG |
IPC |
SECFG_IPC |
SDM32K |
SECFG_SDM32K |
AUDIO_CFG |
SECFG_AUDIO_CFG |
WIFI_CFG |
SECFG_WIFI_CFG |
RSVD |
SECFG_RSVD |
SPORT0_I2S |
SECFG_SPORT0_I2S |
SPORT1_I2S |
SECFG_SPORT1_I2S |
AES |
SECFG_AES |
SHA |
SECFG_SHA |
GDMA0_CFG |
SECFG_GDMA0_CFG |
SPI0 |
SECFG_SPI0 |
SPI1 |
SECFG_SPI1 |
I2C0 |
SECFG_I2C0 |
I2C1 |
SECFG_I2C1 |
DBG_TIMER |
SECFG_DBG_TIMER |
ECDSA |
SECFG_ECDSA |
Calling TZ_ConfigSlaveSecurity() in secure project can set the security attribute of a slave port:
void TZ_ConfigSlaveSecurity(PPC_PeripheralId Perip, u32 Status)
When a slave port is configured as secure, its register can only be accessed from secure world, and non-secure world can’t read or write it.
When a slave port is configured as non-secure, its register can be accessed from both secure world and non-secure world.
备注
TZ_ConfigSlaveSecurity() can only be called from secure world.
The following peripherals can be configured directly through this API:
Peripherals |
Perip parameter |
|---|---|
SPORT3_I2S |
SECFG_SPORT3_I2S |
SPORT2_I2S |
SECFG_SPORT2_I2S |
SPORT1_I2S |
SECFG_SPORT1_I2S |
SPORT0_I2S |
SECFG_SPORT0_I2S |
VAD |
SECFG_VAD |
AUDIO_CDEDC |
SECFG_AUDIO_CDEDC |
TIMER |
SECFG_TIMER |
TRNG |
SECFG_TRNG |
LEDC |
SECFG_LEDC |
UART3_BT |
SECFG_UART3_BT |
UART2 |
SECFG_UART2 |
UART1 |
SECFG_UART1 |
UART0 |
SECFG_UART0 |
DDRC |
SECFG_DDRC |
PSRAM_CTRL |
SECFG_PSRAM_CTRL |
RXI300_HS |
SECFG_RXI300_HS |
HS_SYSON |
SECFG_HS_SYSON |
I2C2 |
SECFG_I2C2 |
I2C1 |
SECFG_I2C1 |
IR |
SECFG_IR |
ECDSA |
SECFG_ECDSA |
ED25519 |
SECFG_ED25519 |
RSA |
SECFG_RSA |
MIPI_DSI |
SECFG_MIPI_DSI |
SPI1 |
SECFG_SPI1 |
SPI0 |
SECFG_SPI0 |
GDMA0_CFG |
SECFG_GDMA0_CFG |
LCDC_CFG |
SECFG_LCDC_CFG |
SDEMMC |
SECFG_SDEMMC |
SHA |
SECFG_SHA |
AES |
SECFG_AES |
USBOTG_CFG |
SECFG_USBOTG_CFG |
WIFI |
SECFG_WIFI_CFG |
ZIGBEE |
SECFG_ZIGBEE |
DDR_BSTC |
SECFG_DDR_BSTC |
DDR_PHY |
SECFG_DDR_PHY |
BT_CFG |
SECFG_BT_CFG |
The TrustZone implementation of the following peripherals is different. Refer to User Manual for more details.
Timer
TRNG
Watchdog
OTP
GDMA
Cypto Engine (SHA/AES)
How to Configure the Security of an Interrupt
Calling NVIC_ClearTargetState() in the secure project can configure the security of an interrupt:
uint32_t NVIC_ClearTargetState(IRQn_Type IRQn)
When the secure interrupt occurs, it will be reported to the secure world and the ISR handler will be obtained from the secure vector table.
When the non-secure interrupt occurs, it will be reported to the non-secure world and the ISR handler will be obtained from the non-secure vector table.
备注
NVIC_ClearTargetState() can only be called from secure world.