Adjust Linux Layout
Note
All content in this chapter applies to NAND flash.
How to Reduce Size of Images
In some cases, users may need to reduce the image size. The following explains how to make the image size smaller.
How to Reduce Size of ROOTFS Image
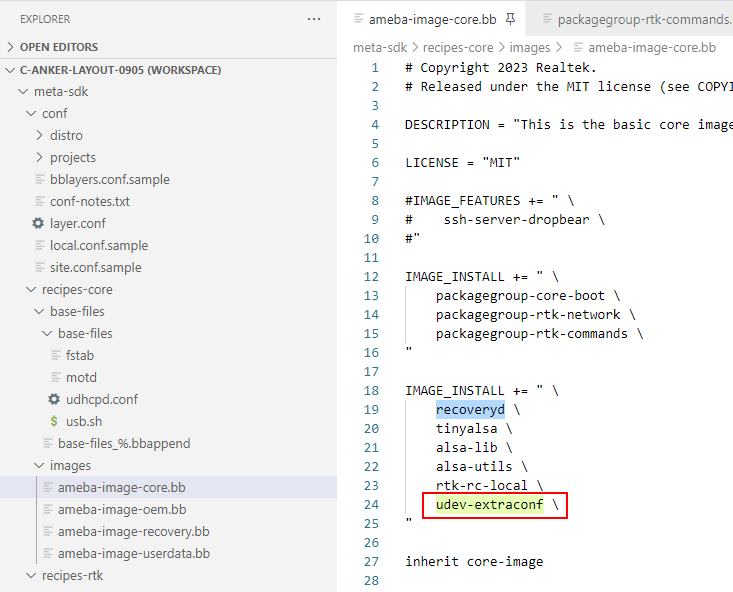
The plugins which are not needed in these directory can be deleted.
<sdk>/sources/yocto/meta-realtek/meta-sdk/recipes-core/images/ameba-image-core.bb
<sdk>/sources/yocto/meta-realtek/meta-realtek-bsp/recipes-core/packagegroups/packagegroup-rtk-commands.bb
<sdk>/sources/yocto/meta-realtek/meta-realtek-bsp/recipes-core/packagegroups/packagegroup-rtk-network.bb
Build again, produce a new rootfs.img, you could see that its size is smaller than before.
How to Reduce Size of KERNEL Image
Formulate New Layout
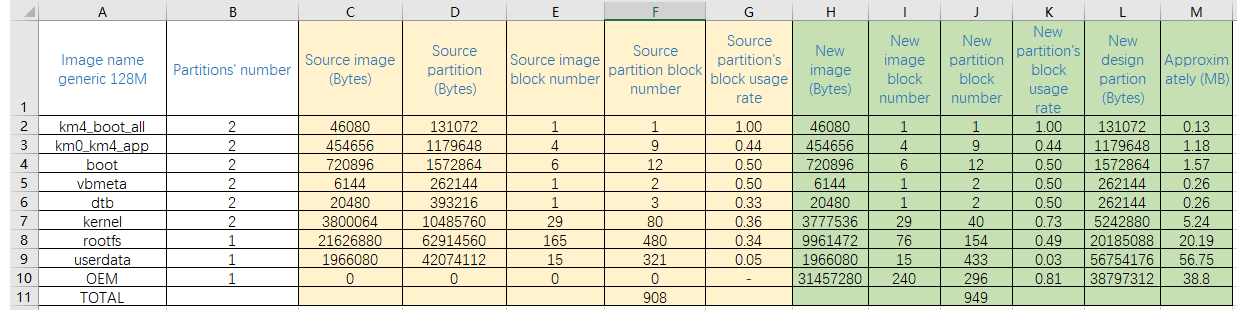
After procedure in Section How to Reduce Size of ROOTFS Image and How to Reduce Size of KERNEL Image, an example of the partitions’ sizes are as below. Where the OEM followed is the additional partition expected for example (the same below).
Note
The recovery kernel is initramfs, has a fixed size, the image size is 4.484M, so that the partition of kernel is at least 5M.
The basic unit of partition of NAND flash is block (whose size is 128KB), therefore the division of layout should be an integer multiple of block.
It is not suggested to reduce the sizes of km4_boot_all.bin, km0_km4_app.bin, boot.img, and vbmeta.img, because that they have small sizes in nature, can occupy few blocks, and the cost of reducing them is relatively high.
The size of vbmeta.img plus dtb.img is smaller than one block. However, if they are only allocated with one block, consider that there may be bad blocks in NAND, if the block allocated for them are bad, the images can not be programmed any more. So, for the sake of system robustness, it is suggested to allocate two blocks for them at least.
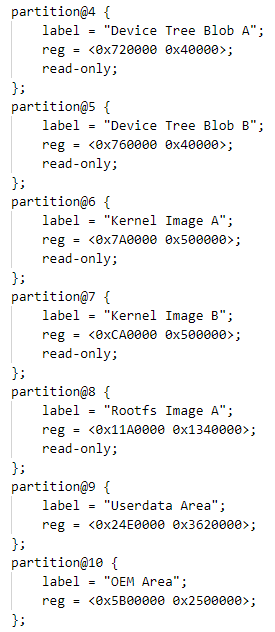
Offset and Size of Each Layout in DTS
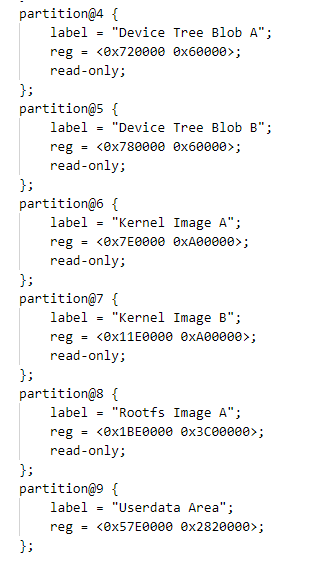
For example of machine generic 128M, the offset and size of each layout in DTS is shown as below.

Where A means the A part of dtb, kernel, B means the B part of dtb, kernel. And the hexadecimal values are offsets based on FLASH base address.
Offset and Size of Each Layout in ImageTool
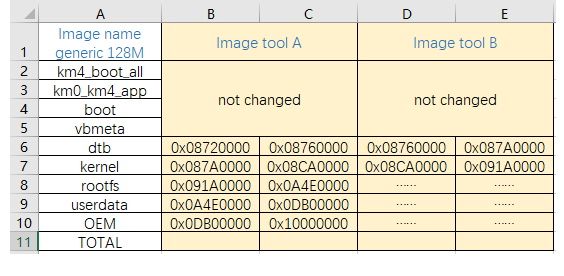
For example of machine generic 128M, the offset and size of each layout in ImageTool is shown as below. Where all the hexadecimal values are calculated by the offsets in Section Offset and Size of Each Layout in DTS.
Note
It is ensured that the end address is equal to 0x10000000.
How to Adjust Size of Layout in DTS
The directory of DTS file is <sdk>/sources/kernel/linux-5.4/arch/arm/boot/dts for kernel 5.4.x, and <sdk>/kernel/linux-6.6/arch/arm/boot/dts/realtek/ameba for kernel 6.6.x.
User can configure the value of partition reg, according to the offset and size in Section Offset and Size of Each Layout in DTS.
The figure below shows an example of a before-and-after comparison of adjusting the layout in DTS.
How to Adjust Uboot Defconfig
The directory of file defconfig is:
<sdk>/sources/boot/uboot/configs
CONFIG_MTDPARTS_DEFAULT
Before Modification
CONFIG_MTDPARTS_DEFAULT="mtdparts=spi-nand0:0x20000@0x20000(cert-bin),0x40000@0x620000(misc),0x40000@0x6A0000(vbmeta),0x40000@0x6E0000(r-vbmeta),0x60000@0x780000(r-dtb),0xA00000@0x11E0000(r-uImage),0x60000@0x720000(dtb),0xA00000@0x7E0000(uImage)"
After Modification
According to the offset and size in Section Offset and Size of Each Layout in DTS, the CONFIG_MTDPARTS_DEFAULT should be:
CONFIG_MTDPARTS_DEFAULT="mtdparts=spi-nand0:0x20000@0x20000(cert-bin),0x40000@0x620000(misc),0x40000@0x6A0000(vbmeta),0x40000@0x6E0000(r-vbmeta),0x40000@0x760000(r-dtb),0x500000@0XCA0000(r-uImage),0x40000@0x720000(dtb),0x500000@0x7A0000(uImage)"
IMAGE Load to DDR Configure
NAND allows a bad block rate of 2%, so that the size of the load image here should be slightly smaller than the value calculated in Section Offset and Size of Each Layout in DTS.
- IMG_FLASH_SIZE:
The size of kernel image transferred from flash to DDR.
- FDT_FLASH_SIZE:
The size of dtb image transferred from flash to DDR. The space allocated to dtb image has already been the maximum (64KB), so that FDT_FLASH_SIZE will not be adjusted any more.
- RECOVERY_IMG_FLASH_SIZE:
The size of recovery kernel image transferred from flash to DDR.
- RECOVERY_FDT_FLASH_SIZE:
The size of recovery dtb image transferred from flash to DDR.
- SYS_TEXT_BASE:
The start address of DDR after image transferred from flash to DDR (not adjusted).
- KERNEL_ADDR:
The start address of kernel image transferred to DDR (not adjusted).
- FDT_ADDR:
The start address of dtb image transferred to DDR. The space allocated to dtb image has already been the maximum (64KB), so that FDT_ADDR will not be adjusted any more.
The comparison before and after modification is shown as below.
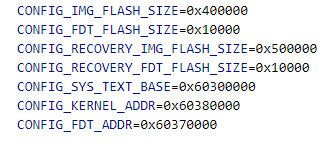
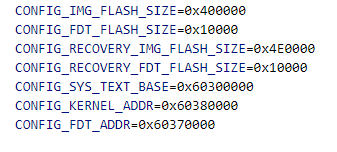
The positions of kernel and dtb in DDR are originally small, so that no additional modification is required. The size of recovery initramfs needs to reserve a bad block for 0x500000, so it is adjusted to 0x4E0000.
How to Adjust Size of UBI When Building
userdata ubi -c
The position is <sdk>/source/yocto/meta-sdk/recipes-core/images/ameba-image-userdata.bb.
Before modification, it is as below:
MKUBIFS_ARGS = "-m 2048 -e 126976 -c 297 --jrn-size=380928"
Then you will adjust its size to 56.75M, at first round it down to 56M, then calculate as this formula:
MKUBIFS_ARGS = "-m 2048 -e 126976 -c 404 --jrn-size=380928"
rootfs ubi -c
The position is <sdk>/source/yocto/meta-realtek-bsp/conf/machine/rtl8730elh-va7.conf.
Before modification, it is as below:
MKUBIFS_ARGS = "-F -m 2048 -e 126976 -c 436 -j 380928"
Then you will adjust its size to 20.19M, at first round it down to 20M, then calculate as this formula:
MKUBIFS_ARGS = "-F -m 2048 -e 126976 -c 116 -j 380928"
How to Adjust the Layout in ImageTool
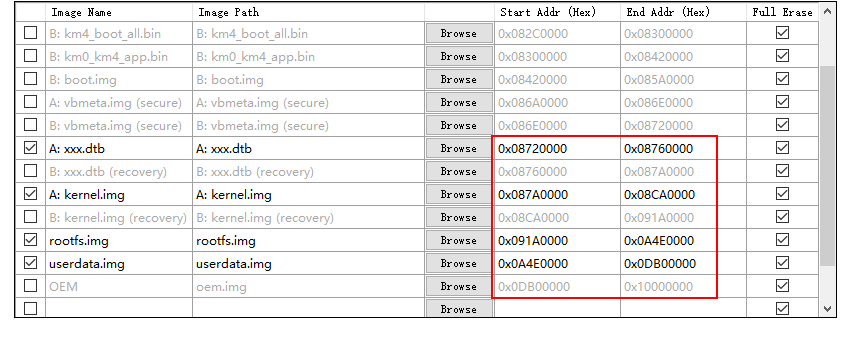
Before the modification, the default start address and end address are shown in the ImageTool as below.
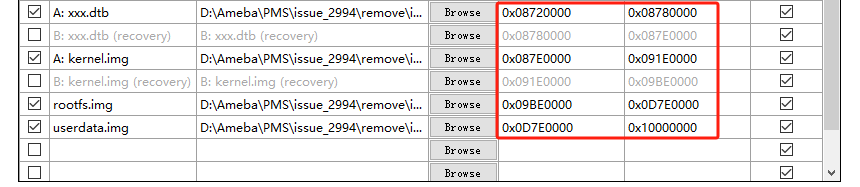
You can adjust the start address or end address according to Section Offset and Size of Each Layout in ImageTool.
After the modification, the new start address and end address may be like below.
Add Partition of OEM
New File ameba-image-oem.bb
User can add new file ameba-image-oem.bb in directory <sdk>/sources/yocto/meta-realtek/meta-sdk/recipes-core/images. The content could be as below.
# Copyright 2023 Realtek.
# Released under the MIT license (see COPYING.MIT for the terms)
SUMMARY = "This is the oem image."
IMAGE_FSTYPES = "ubi"
MKUBIFS_ARGS = "-m 2048 -e 126976 -c 260 --jrn-size=380928"
UBINIZE_ARGS = "-m 2048 -p 131072"
UBI_IMGTYPE = "ubifs"
IMAGE_NAME_SUFFIX = ".oem"
IMAGE_INSTALL = ""
IMAGE_LINGUAS = ""
PACKAGE_INSTALL = ""
inherit image
Where 260 is calculated as this formula:
User can use bitbake command to build this ameba-image-oem.
Mount MTD Block in DTS
For example of machine generic 128M, user can modify the file of rtl8730e-spi-nand-128m.dtsi to mount specific MTD block.
Here, we add a MTD block 10 in dts file.
// Add ubi.mtd=10 at end of this line.
bootargs = "console=ttyS0,1500000 earlycon psci=enable ubi.mtd=8 ubi.block=0,0 root=/dev/ubiblock0_0 rootfstype=squashfs,ubifs ubi.mtd=9 ubifs ubi.mtd=10";
Mount OEM Partition Automatically
User can add procedure to let the OEM partition be mounted automatically, in the script file <sdk>/sources/yocto/meta-realtek/meta-realtek-bsp/recipes-core/initscripts/initscripts-1.0/overlay.sh.
pivot_root /mnt/merged /mnt/merged/rom
#Add the procedure here.
mkdir -p /oem
mount -t ubifs /dev/ubi2_0 /oem
if [ ! -e /run/udev ] ; then
mkdir -p /run/udev
fi
In another way, user can implement automatically mounting by modifying the rcS file: <sdk>/sources/yocto/meta-realtek/meta-sdk/recipes-rtk/rtk-rc-local/rtk-rc-local/rcS. User can choose any way of them.
cat /etc/motd
#Add the procedure here.
mkdir -p /oem
mount -t ubifs /dev/ubi2_0 /oem
# Set country to Worldwide
#iw reg set 00
Build the OEM separately.
bitbake ameba-image-oem
Build
Before building new images, user should execute mclean to clean the former images.
mclean
Execute m or bitbake to build new ones finally.
Debug
Can Not Load Kernel at Uboot
There may be problems when loading kernel at uboot, as the figure below. User can execute env print or printenv, then can see that the environment variables are different with expected.

For this issue, user is suggested to check the information below:
Refer to section How to Adjust Uboot Defconfig, make sure the contents modified are as expected.
Clean the former image at first.
bitbake atf-ameba -c cleanall
bitbake u-boot-ameba -c cleanall
Build it again, make sure the contents modified are in the new image.
Can Not Find OEM Image
Before building, user can make OEM image manually at first.
bitbake ameba-image-oem
The following steps describe how to add it into command m.
Edit the script file
<sdk>/sources/yocto/meta-realtek/tools/envsetup.sh.Then add this part of oem into this file, as the figure below.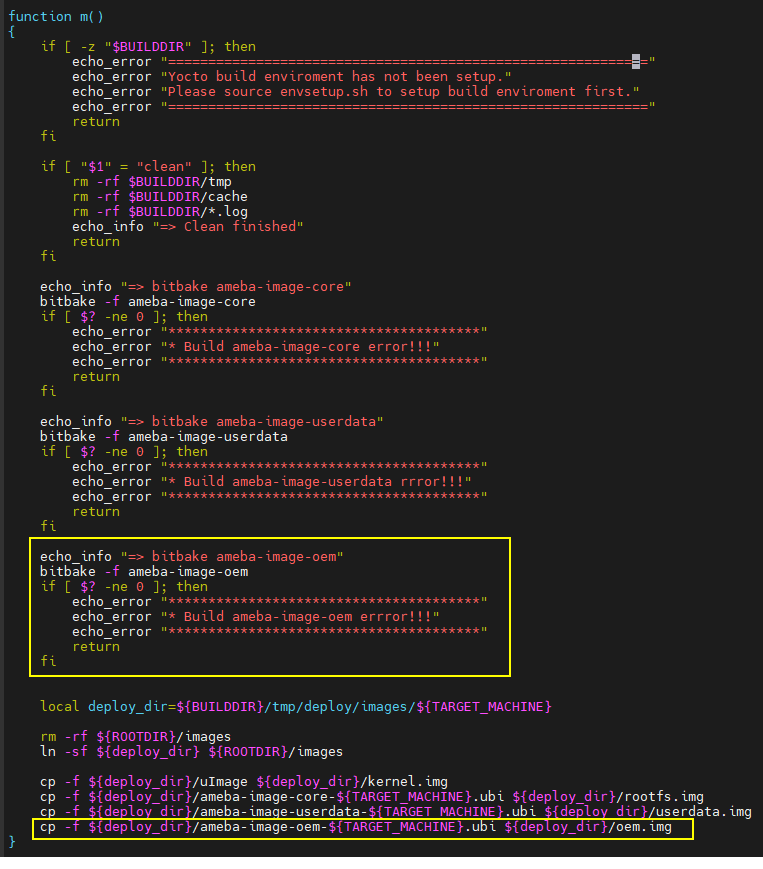
Execute this command to copy the script file to root directory.
cd <sdk>
cp sources/yocto/meta-realtek/tools/envsetup.sh.
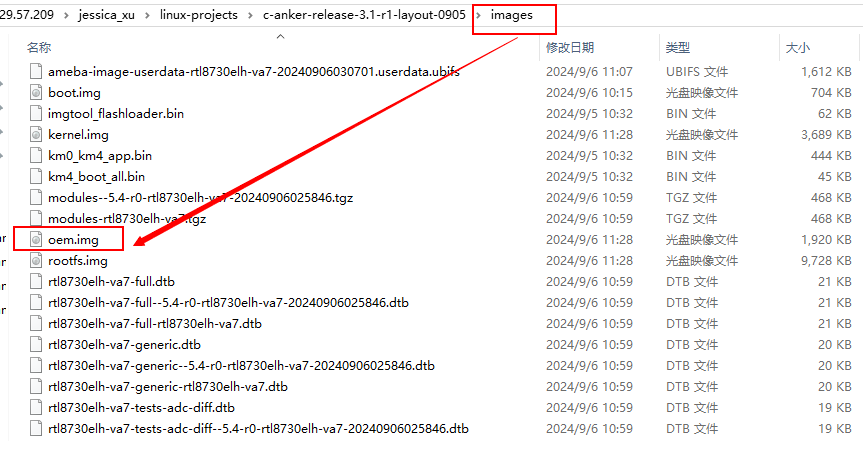
Build it with command m. You can see the image of oem.img produced.
Download Images
User can modify the layout manually as below:
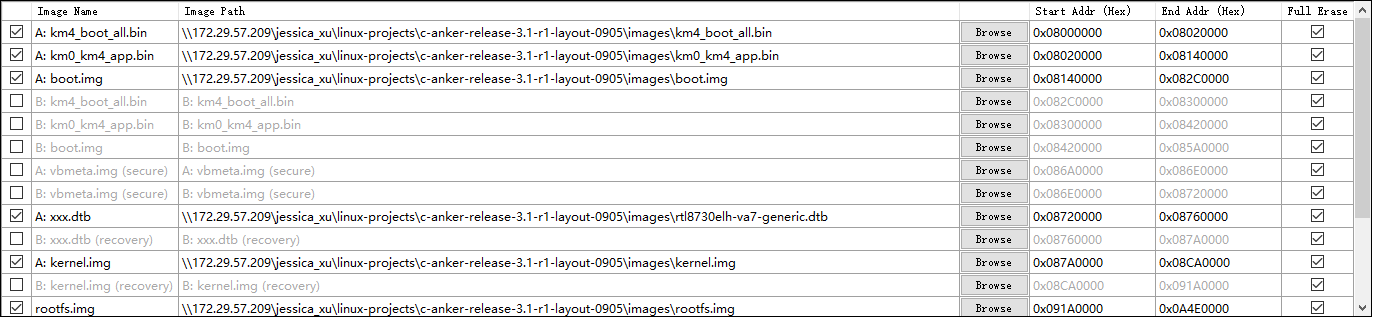

Or, user can load the AmebaSmart_Linux_NAND_128MB_Anker.rdev for Image-Tool.
If the OEM is built manually alone, user should download the meba-image-oem-rtl8730elh-va7-20240906032841.oem.ubi instead. If user has modified this filename into oem.img as described in envsetup.sh (Can Not Find OEM Image), please download oem.img.
Function Test
Boot Normally
During booting, user can see the information as below:
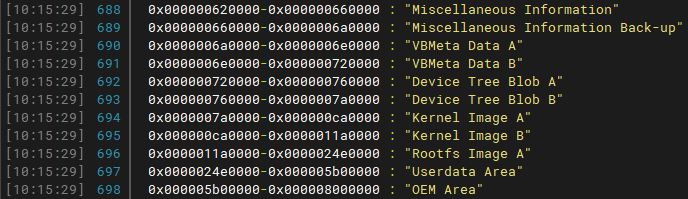
User can see that the information is same as layout expected.
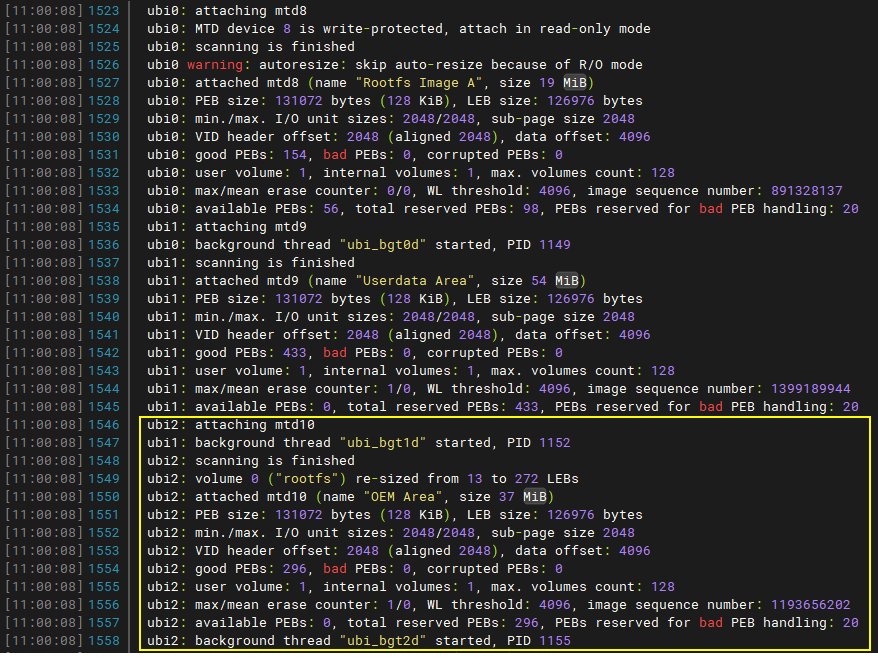
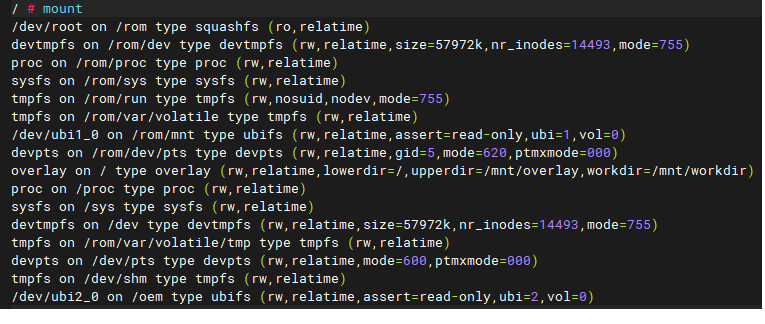
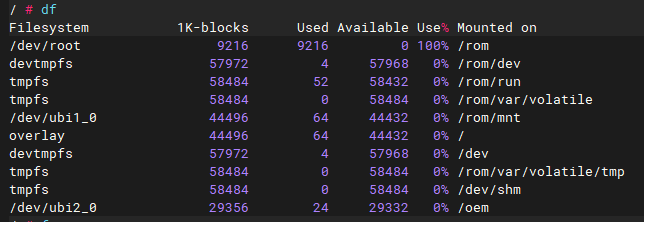
And, if the OEM image is loaded, user can see more information as below:

Recovery System
The dts file for recovery is as below:
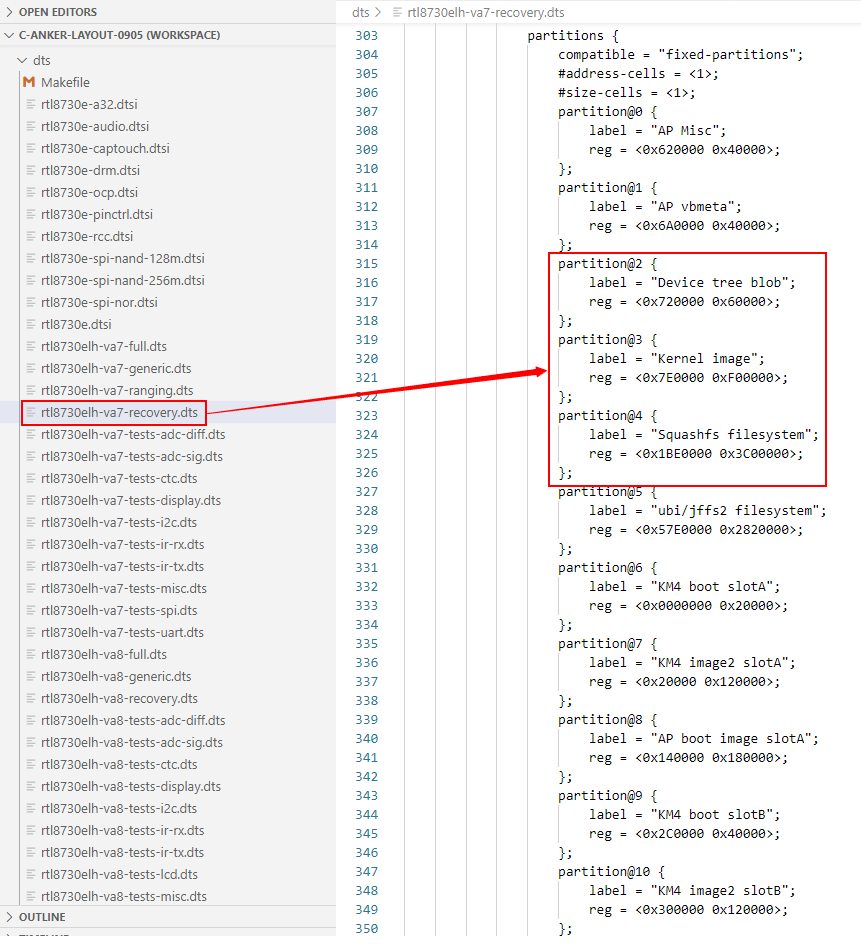
If you need to modify this dts file, you can adjust the reg values as below:

If user deals with recovery with USB, the udev-extraconf should be added into ameba-image-core.bb in order to support USB.