This chapter illustrates how to build Realtek’s SDK under GCC environment. It focuses on both Windows platform and Linux distribution. The build and download procedures are quite similar between Windows and Linux operating systems.
For Windows: Windows 10 64-bit is used as a platform.
For Linux server: Ubuntu 22.04 64-bit is used as a platform.
The GCC environment includes the CMake compilation environment, Python environment, and other tool software, as shown in the table below。
Software
Version
cmake
>=3.20
ninja
>=1.10.1
make
>=3.82
ccache
>=4.5.1
python3
>=3.10
wget
Recommend newest
7zip
Recommend newest
Users can download the software package provided by Realtek and configure environment variables by scripts. This method will not affect the user’s original software environment and can avoid compatibility issues caused by software version differences.
Download the compressed package and extract it to the /opt/rtk-toolchain folder.
The compressed package needs to be extracted to the default /opt/rtk-toolchain path. If need to change the path, refer to change toolchain path .
Install Python manually since a portable version of Python cannot be provided under Linux.
sudo apt install python3 python3-pip python3-venv
Note
Run python--version to check version of Python, recommanded to use version greater than 3.10.
If there are multiple versions of Python on the host, you can use the command update-alternatives--install/usr/bin/pythonpython/usr/bin/python3.x1 to select a specific version of Python, where x in python3.x1 represents the desired version number.
If you encounter the error command'python'notfound, try running the following command to solve the issue: ln-s/usr/bin/python3/usr/bin/python
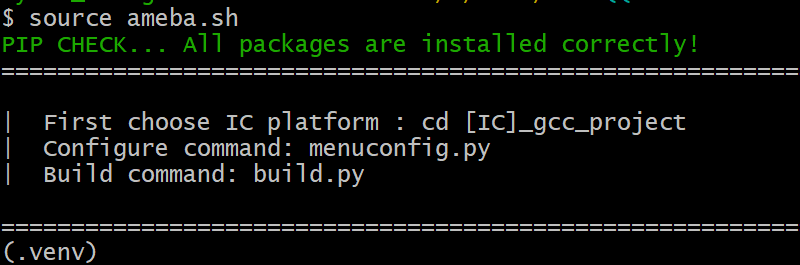
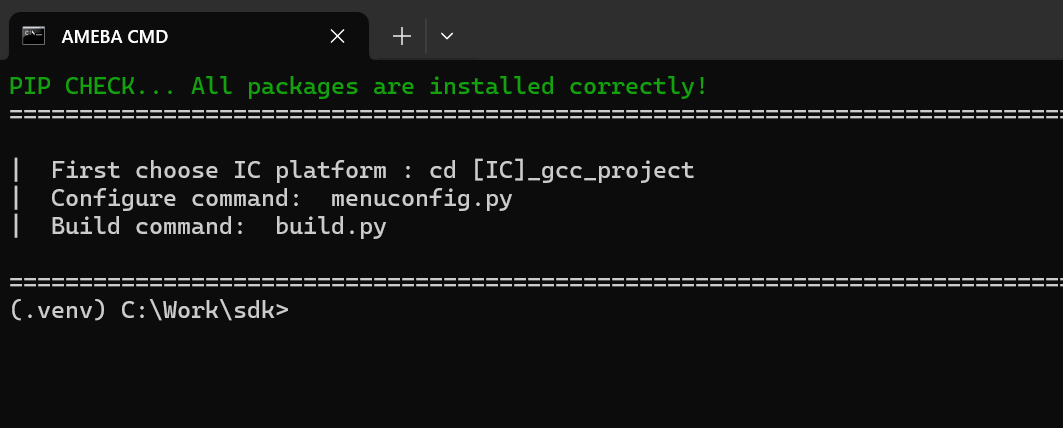
Enter into the root directory of SDK and run sourceameba.sh, which will automatically configure the environment variables.
source ameba.sh
Note
The environment variables will be reset after terminal closed. Therefore, the scripts need to be run again when you open a new terminal.
Create a new folder C:\rtk-toolchain under Disk C.
Download the compressed package and extract it to the C:\rtk-toolchain folder. You can click on any of the links below to download. Users in mainland China are advised to use the aliyun link.
The compressed package needs to be extracted to the specified C:\rtk-toolchain path. If need to change the path, refer to change toolchain path .
Navigate to the SDK root directory and double-click the ameba.bat script. This will automatically configure the environment variables, then you can type commands in this opened terminal.
Note
If users want to use a Unix-like command-line environment such as Git Bash or MSYS2 on Windows, please open a new terminal in the SDK root directory and run sourceameba.sh.
This method relies on Python virtual environment. If you encounter Python system errors, such as messages indicating that a DLL dynamic library missing, try removing the .venv folder in the root directory of the SDK and then run the ameba.bat script again. This will automatically reinstall the Python virtual environment.
By default, the toolchain will be automatically installed in default path when building the project at the first time:
Linux:/opt/rtk-toolchain
Windows:C:\rtk-toolchain
Before the compilation, the build scripts will check if the toolchain exists and if the version of the toolchain match the lastest version. Once error occurs, you should fix the error according to the prompts on the screen and try building again.
The toolchain compressed package is available on GitHub, and the system will attempt to download the toolchain from GitHub by default before the first build. If you encounter any issues with the download, please verify that your host machine can correctly access GitHub. If you cannot access GitHub, please use the following commands to switch the download source:
build.py-DUSE_ALIYUN_URL=True
If you need to modify the toolchain installation path, create an environment variable RTK_TOOLCHAIN_DIR in your system and assign it the modified installation path.
Open the ~/.bashrc file and add the following line at the end:
To make the environment variable take effect immediately, please run:
source ~/.bashrc
In Settings > System Properties > Environment Variables, create a new variable named RTK_TOOLCHAIN_DIR with the value set to the desired installation path. To make the environment variable take effect, please reopen terminal.
Note
If you already have a downloaded toolchain archive, move the archive to the installation path and run build.py again.
If you encounter the error DownloadFailed, check your network connection. If the issue persists, refer to Step 2.
If you encounter the error: CreateToolchainDirFailed.MayNotHavePermission, try creating the folder manually. If the issue persists, refer to Step 3 to change the default installation path.
If you encounter the error: UnzipFailed , the compressed package might be corrupted. Delete it manually from the installation path and run build.py again.
After completing the above steps, the following files will be present under the rtk-toolchain path:
The SDK should be configured and compiled within the SOC project directory, where the relevant paths include the provided Python scripts for these tasks.
After exiting the menuconfig menu, the UI will prompt the user to save the configuration. If saved, the configuration will be stored in the menuconfig folder in the current directory.
The folder typically contains the following items:
.config file: Stores the selected configuration options by the user.
.config_{MCU} file: Final configuration files allocated to each MCU, such as .config_km4, .config_km0, which are derived from processing the .config file.
project_{MCU}/platform_autoconf.h: Header files generated based on the final configuration files for C/C++ source files.
Note
Each configuration result is saved to the menuconfig/.config file, which will be loaded in next UI menuconfig session.
When opening menuconfig UI for configuration, the records of last configurations will be display, meaning that configuring through UI is persistent.
Initial Configuration
Project configurations are parsed from menuconfig/.config. However, when the project does not contain a menuconfig/.config file, indicating an empty configuration, initial configuration will be loaded automatically.
amebaxxx_gcc_project/default.conf records the default configuration options required for this SOC model and serves as the initial configuration value for the SOC project.
Specifically, when compiling through the command build.py-a specifying an example or in the project path, the prj.conf file (if any) in that path will also take effect as the initial configuration, with higher priority than the default.conf file in the amebaxxx_gcc_project path.
For undefined items in default.conf and prj.conf, the default values defined in Kconfig will be used as the initial values.
Configuration flow is shown as below:
Other Configuration Commands
Clean Configuration
menuconfig.py -c
This command will clean the current project’s configuration (menuconfig folder) and build artifacts (if any, default in build folder).
Configure via conf Files.
Users can combine some configuration options into one conf file instead of manual selection. This allows configuration completion with a single command. For more detailed information about conf files, please refer to conf File Introduction
menuconfig.py -f <name1>.conf <name2>.conf ...
<name1>.conf, <name2>.conf are user-defined configuration collection files. When running the menuconfig.py-f command, you can specify one or more conf files. If there are identical configuration items in multiple conf files, the priority of <name2>.conf will be higher than <name1>.conf. For example, if <name1>.conf defines CONFIG_BT_MENU=y and <name2>.conf defines CONFIG_BT_MENU=n, then CONFIG_BT_MENU=n will ultimately take effect.
Note
Before executing -f, the menuconfig folder will be automatically deleted. Therefore, the configuration results after -f execution will not be influenced by the previous .config file, meaning this -f configuration method is non-persistent.
Executing this command will automatically load default.conf as the first input file.
Generate conf Files.
menuconfig.py -s <name>.conf
If users do not want to manually write conf files, they can first run menuconfig.py to use UI for manual configuration. After exiting, use the menuconfig.py-s command to save the current configuration results as a <name>.conf file.
Subsequently, users can load the saved conf file using menuconfig.py-f<name>.conf.
This section illustrates how to build SDK for both Windows and Linux.
Realtek provides a build.py script to simplify the build command of projects. Common commands are listed below:
Function
Command
Description
Help
build.py-h
List supported commands
Build
build.py
Incremental build of project
Pristine Build
build.py-p
Remove all products and build
Specify Example
build.py-a<APP>
Build example named ‘APP’
Specify Target
build.py-gtarget
Build specified target
Cleanup
build.py-c
Clean compilation products
Debug
build.py-debug
Enter debug mode
Help command
If you are using the build.py script for the first time, use the following command to understand its usage.
build.py -h
With the -h or --help option, all supported commands will be listed.
build.py -husage: build.py [-h] [-a APP] [-c] [-p] [-g {flashloader,imgtool_flashloader,gen_imgtool_floader}] [-gdb] [-debug] [-D DEFINED [DEFINED ...]] [--new NEW [NEW ...]]options:-h, --help show this help message and exit-a APP, --app APP application path-c, --clean clean-p, --pristine pristine build-g {flashloader,imgtool_flashloader,gen_imgtool_floader}, --target {flashloader,imgtool_flashloader,gen_imgtool_floader} custom target-gdb, --gdb gdb-debug, --debug debug-D DEFINED [DEFINED ...], --Defined DEFINED [DEFINED ...] user defined variables--new NEW [NEW ...] build.py --new-prj <target_dir> [-a <APP>]
Pristine Build
build.py -p
Pristine build means that there are no previous residual products affecting this build. All previously products and configurations will be removed before this build. The -p option is equivalent to the --pristine option.
Note
A clean build will also remove the menuconfig folder, and any previous configurations will be discarded. This build process will use initial configurations.
If you only need to clean up the build artifacts but want to retain the previous configurations, please use the build.py-c command for cleanup.
Incremental Build
build.py
Without any arguments, the project will undergo incremental build, which significantly saves time compared to full build.
Build Specified Example
build.py -a <APP>
Some application examples are provided under the ${SDK}/component/example directory. To build one of these examples, pass the application name or path to build.py using the -a or --app options.
For instance, to build the ${SDK}/component/example/network_protocol/http_client example, you can input the following command:
build.py -a ${SDK}/component/example/network_protocol/http_client//orbuild.py -a http_client
If you do not pass an app name or path through -a, it will build a default application, which only enables wireless connection.
Note
The examples provide file named prj.conf. When the user has not configured the project, running build.py-a<APP> will combine amebaxxx_gcc_project/default.conf with example/.../<APP>/prj.conf to use initial configuration.
If menuconfig folder already exists in current project, you can running menuconfig.py-f/.../prj.conf first or reconfigure manually, then build it using build.py-a<APP>. Alternatively, you can directly use build.py-a<APP>-p to delete previous configuration files.
Build Specified Target
build.py -g <TARGET>
By default, all necessary targets will be built together. Specific targets can be built individually using the -g or --target options. Use the -h option to view all available targets.
For example, to regenerate imgtool flashloader, enter the following command:
build.py -g gen_imgtool_floader
Project Cleanup
build.py -c
Both -c and --clean clean up the current project’s products and intermediate files. But .config files will be retained.
Pass CMake Cache Variables
build.py -D CACHE_VAL1=VALUE1 CACHE_VAL2=VALUE2 …
CMake cache variables’ initial values can be set using the -D option. To inherit this functionality, build.py also supports the -D option. Predefined values by CMake and user-defined values can both follow after -D.
More details about cache variables for this project can be found in the CMakeLists.txt file under the ${SDK}/amebaxxx_gcc_project directory.
Note
Native CMake command requires each variable definition to have a -D prefix, e.g., -DCACHE_VAL1=VALUE1-DCACHE_VAL2=VALUE2
However, build.py requires all variables to follow a single -D with spaces, e.g., -DCACHE_VAL1=VALUE1CACHE_VAL2=VALUE2
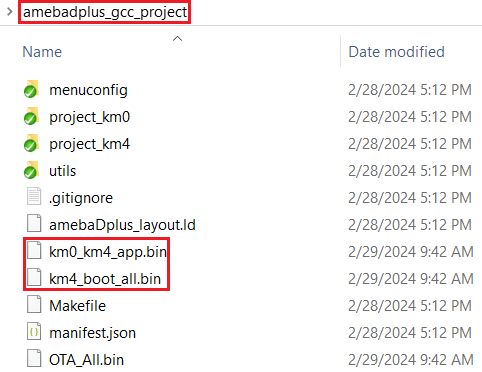
After compilation is complete, the image files will be copied to the \amebadplus_gcc_project path. Users can also find the image files in the following folders:
\amebadplus_gcc_project\project_km0\asdk\image
\amebadplus_gcc_project\project_km4\asdk\image
Intermediate files generated by CMake will be stored in the build folder.
If the generation fails, try running build.py-c and then recompile.
If you want to obtain the .map files for debugging, please look in the following paths:
\amebadplus_gcc_project\project_km0\asdk\image
\amebadplus_gcc_project\project_km4\asdk\image.
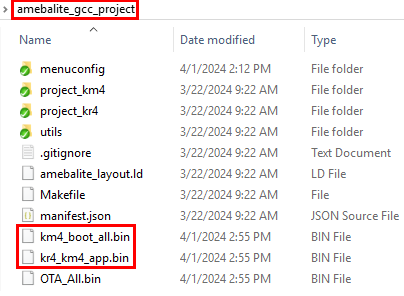
After compilation is complete, the image files will be copied to the \amebalite_gcc_project path. Users can also find the image files in the following folders:
\amebalite_gcc_project\project_km0\asdk\image
\amebalite_gcc_project\project_km4\asdk\image
Intermediate files generated by CMake will be stored in the build folder.
If the generation fails, try running build.py-c and then recompile.
If you want to obtain the .map files for debugging, please look in the following paths:
amebalite_gcc_project\project_kr4\vsdk\image
amebalite_gcc_project\project_km4\asdk\image
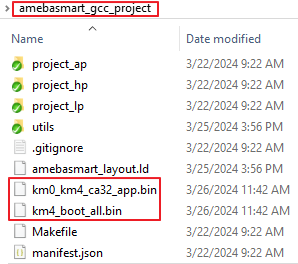
After compilation is complete, the image files will be copied to the \amebasmart_gcc_project path. Users can also find the image files in the following folders:
\project_hp\asdk\image
\project_lp\asdk\image
\project_ap\asdk\image
Intermediate files generated by CMake will be stored in the build folder.
If the generation fails, try running build.py-c and then recompile.
The previous section introduced how to configure and build under amebaxxx_gcc_project directory, where users develop their projects within the Realtek-provided SDK. However, in some scenarios, users wish to create independent project directories separate from the Realtek SDK, making it easier to maintenance, updates, or co-develop their project. The following section introduces the development mode based on external projects.
Creation Command
Navigate to the corresponding GCC project path of the SOC and run:
cd {SDK}/amebaxxx_gcc_projectbuild.py --new <project_dir> [-a <APP_NAME>]
This will create a new project in the project_dir path using APP_NAME as a template from the examples. For example:
build.py--new~/my_project-ahttp_client
The created project directory includes:
ameba.bat, ameba.sh: Users can use these scripts to set environment variables.
menuconfig.py, build.py: Used for configuring and compiling the project.
CMakeLists.txt: The entry file for compiling this new project.
Kconfig: Users can add their own configuration options here.
<APP_NAME> folder: Files specified by the template will be copied into this folder.
prj.conf: Used to record the default configuration of the project.
Setting Up Environment in the Created Project Directory
The ameba.bat and ameba.sh scripts in the project directory reference the scripts in the root directory of Realtek SDK. Users can set up the environment using any script.
Configuring in the Created Project Directory
The usage is the same as the commands described in Configuring SDK. The generated menuconfig folder will be created in this project directory.
Compiling in the Created Project Directory
The usage is the same as the commands described in Building SDK Code. The generated build folder will be created in this project directory.