Build Environment for DSP
Preparation
In order to develop HiFi5 DSP, you need to downoad Software Packages and prepare Xtensa Xplorer License first.
Software Packages
Download the software packages according to your operating system.
Item |
Packages |
Comment |
|
|---|---|---|---|
Xtensa Xplorer installer |
Linux |
|
|
Windows |
Xplorer-9.0.18-windows-installer.exe |
||
HiFi5 DSP configurations |
Linux |
|
|
Windows |
|
Get them from Realtek released
DSP SDK (
configurations folder) |
|
Xtensa Xplorer License
Xtensa Xplorer license is also essential along with the software packages.
You can send an E-mail to <claire_wang@realsil.com.cn> to apply for a temporary license.
When sending the E-mail, the following information is needed:
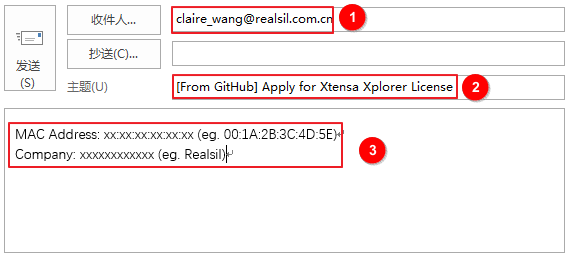
Essential Information
MAC address
Company
University & School (for students only)
Note
One cunstomer can only apply for one license.
The validity period of the temporary license is 3 months.
Installing Toolchains
Install the Xplorer, a GUI based IDE tool provided by Cadence to build DSP applications.
Windows
Installing Xtensa Xplorer
Double-click the installer and follow the prompts to install it. The installer used in this guide is Xploere-9.0.18-windows-installer.
After the installation is complete, opening Xplorer GUI will usually remind you to update the software. Be sure to update the software, because the new patch will fix some toolchain problems. These problems can cause compiler crashes. If you encounter a situation where the compiler crash when compiling a certain piece of code, update the toolchain and try again.
Note
Remember the path when installing the IDE. The path we use is C:\usr.
Installing HIFI5_PROD_1123_asic Build Configuration
Build Configuration is a term that describes all parameters and necessary builds for the Tensilica processor implementation you are developing with. It is mandatory to install a specific build configuration before starting development on DSP. We will use the default SDK named “dsp” in the following sections. Contact Realtek’s FAE if you haven’t got it.
Double-click RUN Xplorer 9.0.18 on the desktop (or from the start menu).
Click Browse to set the workspace to
<dsp_sdk>\project.Caution
The workspace can’t be set freely.
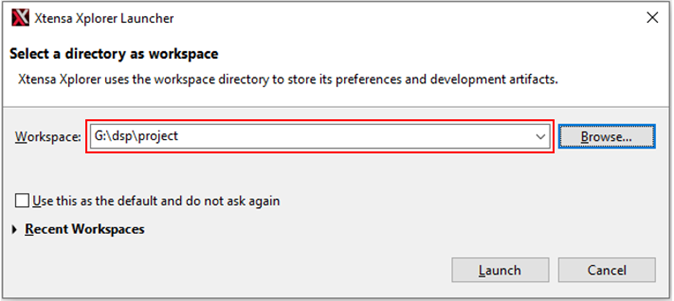
Click Launch to enter the main window of Xplorer.
The build configuration can be installed into the IDE using the System Overview panel which is in the lower left corner by default.
If this panel is not visible, it can be toggled using menu . Right click on Configuration and select New Configuration.

Select the fourth item in the new pop-up window, then click Next.

Click Browse to find the corresponding configuration file (by default under
dsp\), then click Add Build, and finally click Finish.HIFI5_PROD_1123_asic_UPG_win32_redist.tgzis for CALL0 ABI, andHIFI5_PROD_1123_asic_wUPG_win32_redist.tgzis for window ABI. Take CALL0 ABI configuration as an example: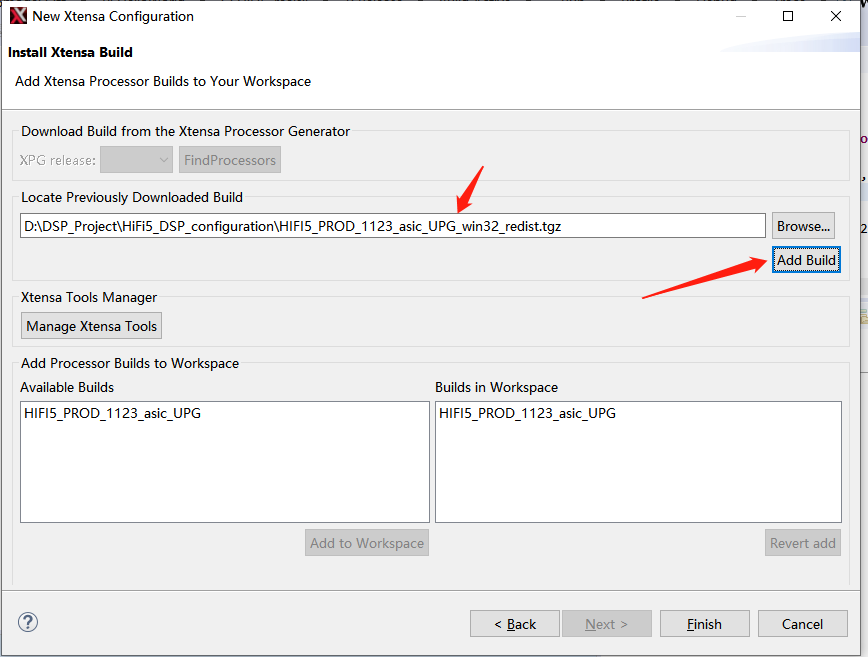
If the entry in the red box below appears in System Overview, the configuration has been successfully installed.
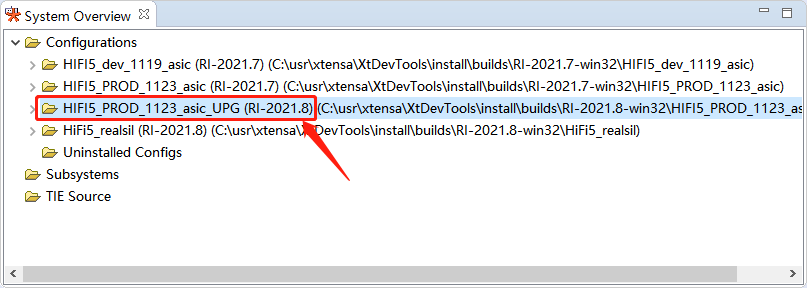
Then, you can use the same procedure to install another window ABI configuration. We recommend to add the bin directory of Xtensa tool to the system path, otherwise some helpful scripts may not find the executable.
For Windows, the bin directory is C:\usr\xtensa\XtDevTools\install\tools\RI-2021.8-win32\XtensaTools\bin.
Note
The python script version for post-processing is recommended to be python3.8. You may encounter problems if using python3.11.
Installing Xtensa on Chip Debugger Daemon
The Xtensa on Chip Debugger Daemon (xt-ocd) is a powerful GDB-based debugging tool.
It is not installed by default with the Xplorer IDE. A self-extracting executable installer is included with the Xplorer.
The following is a brief installation method of xt-ocd. For more xt-ocd installation guide, refer to xtensa_debug_guide.pdf.
Windows: If Xplorer’s installation path is
C:\usr\xtensa\XtDevTools\downloads\RI-2021.8\tools\xt-ocd-14.08-windows64-installer, due to differences in installation paths and software versions, the paths and installer’s name may be different.Linux: Assuming Xplorer is installed under
/opt/xtensa:cd /opt/xtensa/XtDevTools/downloads/RI-2021.8/tools/ sudo ./xt-ocd-14.08-linux64-installer
xt-ocd will be installed in this path by default:
/opt/Tensilica/xocd-14.08
The j-link driver needs to be installed additionally. Note that the J-link driver version should not be too new, tested V6.20 and V6.44 can meet the requirements. The j-link driver will be installed in the path
/opt/SEGGER/by default. After the installation is complete, you need to execute:ln -s /opt/SEGGER/JLink_V644i/libjlinkarm.so.6 /opt/Tensilica/xocd-14.08/modules/libjlinkarm.so.6
If the libncursesw.so.5 file cannot be found on your system:
sudo ln -s /lib/x86_64-linux-gnu/libncursesw.so.6 /lib/x86_64-linux-gnu/libncursesw.so.5
When you debug in Xplorer, if the error is as follows:
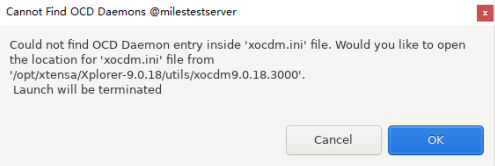
You need to add a line after # [XOCDInstallations] in file /opt/xtensa/Xplorer-9.0.18/utils/xocdm9.0.18.3000/xocdm.ini:
14.08=/opt/Tensilica/xocd-14.08
Installing a License
There are various ways to install a license, here we describe how to install a license in Xplorer when licenses are managed on a server.
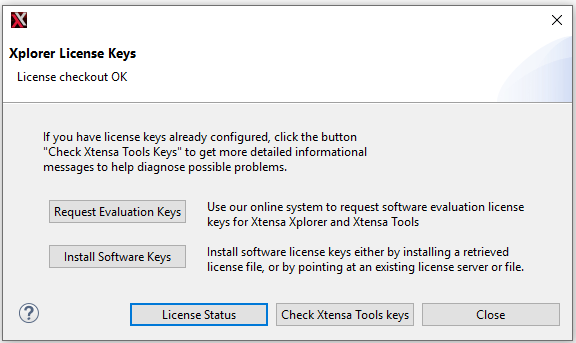
Click Help in the upper part of Xplorer, and choose Xplorer License Keys.
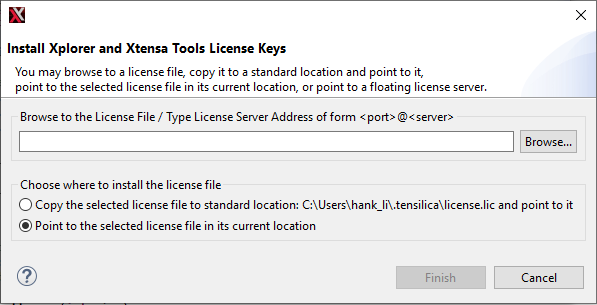
Click Install Software Keys.
Fill in the blank with the server’s port and IP address, select Point to the selected license file in its current location, and click Finish.
Linux Server
This section describes how to install Xplorer-9.0.18 on the Linux server and compile the Xplorer project using headless mode (from command line) on the server.
The headless mode only occupies the license for a short period of time during compilation, which alleviate insufficient licenses problem.
In the following installation process, we recommend using the sudo command instead of the root account.
Installing Dependent Packages
sudo apt-get install libxi6 libxtst6 libxrender1
If you install Xplorer in a Linux server (such as Ubuntu Server 20.04 LTS) but display Xplorer GUI on local PC (X11 forward), we recommend to install GTK support package:
sudo apt-get install libgtk-3-dev
Installing Xtensa Xplorer
chmod +x Xplorer-9.0.18-linux-x64-installer.bin
sudo ./Xplorer-9.0.18-linux-x64-installer.bin
The default installation path is /opt/xtensa. Other components can select all yes.
After the installation is complete, opening Xplorer GUI will usually remind you to update the software. Be sure to update the software, because the new patch will fix some toolchain problems. These problems can cause compiler crashes. If you encounter a situation where the compiler crash when compiling a certain piece of code, update the toolchain and try again.
If Xplorer GUI cannot be opened through X11, you can manually download and install the patch.
The patch we provide (XtensaTools_RI_2021_8_patch734507_linux.tgz) is not necessarily the latest, so it is recommended that users consult Cadence or download the latest patch for XtensaTools_RI_2021_8 through XPG. First copy the patch package to the xtensa tool path (for example: /opt/xtensa/XtDevTools/install/tools/), then decompress the patch and overwrite the original RI-2021.8-linux folder.
Adding a License
To set Xtensa license, add the environment variable LM_LICENSE_FILE or XTENSAD_LICENSE_FILE to the full path of the license file for a node-locked license or <port>@<server> for a floating license (where <port> is the port number noted in Prepare the Floating License File, and <server> is the name of the license server). Example:
export LM_LICENSE_FILE=<port>@<address>
source /etc/profile
Installing HiFi5 Configuration
Decompress the configuration (for window ABI) to the corresponding directory:
cd /opt/xtensa/XtDevTools/install/builds/
sudo tar -zxvf HIFI5_PROD_1123_asic_wUPG_linux_redist.tgz
sudo tar -zxvf HIFI5_PROD_1123_asic_UPG_linux_redist.tgz
The example directory structure after decompression:

Install configuration (for window ABI):
cd /opt/xtensa/XtDevTools/install/builds/RI-2021.8-linux/HIFI5_PROD_1123_asic_wUPG
sudo ./install
Input Xtensa Tools Path (change according to the actual installation path):
/opt/xtensa/XtDevTools/install/tools/RI-2021.8-linux/XtensaTools
What registry would you like to use? [keep default]
Do you want to make "HIFI5_PROD_1123_asic_UPG" the default Xtensa core? [y] [keep default]
Use the same installation procedure to install the CALL0 ABI configuration package
HIFI5_PROD_1123_asic_UPG_linux_redist.tgz.
Coping Configuration Registration File
cd /opt/xtensa/XtDevTools/install/tools/RI-2021.8-linux/XtensaTools/config
sudo cp HIFI5_PROD_1123_asic_UPG-params /opt/xtensa/XtDevTools/XtensaRegistry/RI-2021.8-linux/
sudo cp HIFI5_PROD_1123_asic_wUPG-params /opt/xtensa/XtDevTools/XtensaRegistry/RI-2021.8-linux/
We recommend to add the bin directory of Xtensa tool to the system PATH. Otherwise some helpful scripts may not find the executable.
For Linux, the default bin directory is /opt/xtensa/XtDevTools/install/tools/RI-2021.8-linux/XtensaTools/bin/.
Compiling with CMD
You can use auto_build.sh to compile the project:
cd <dsp_sdk>/project/auto_build
./auto_build.sh
Xplorer will copy project_dsp to a new workspace auto_ws then build the project.
The generated dsp_all.bin and dsp.bin are saved in default <SDK>/dsp/project/image directory.
Therefore, some intermediate compilation files will remain in the auto_ws directory.
Refer to <SDK>/dsp/project/auto_build/readme.txt for the use of auto_build.sh.
Troubleshooting
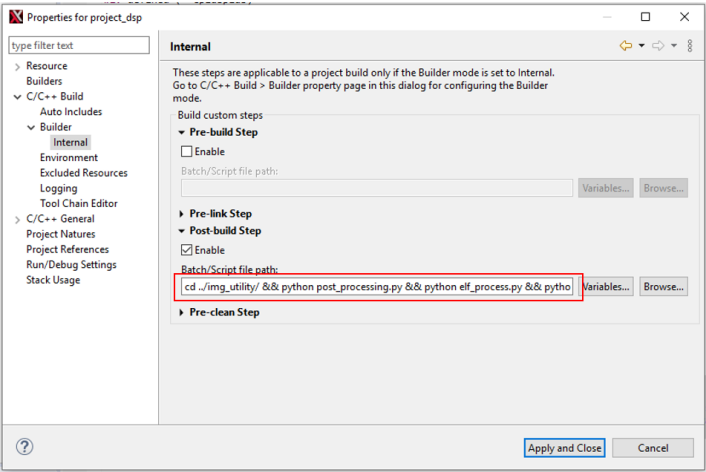
The python script version for post-processing is recommended to be python3.8. You may encounter problems if you use python3.11. If you do not want to change the default Python version of the system, refer to the note in Section Build a Program to change the post-processing command (right click on project_dsp, then select ). Specify the python3.8 in the post-build command.
If you have other versions of Xplorer installed on your system and put there bin directory in your system PATH, when you directly use xt-clang and xt-ar (e.g. using with Cmake, Makefile or python) to compile or link your code rather than Xplorer, the registry value problems may be encountered during the link process: Either the current Xtensa configuration is not properly installed or you are using Xtensa Tools from a different location than you specified when installing the configuration.
If Xplorer can compile the SDK normally but with your method the above problems occur, the problem is generally caused by the bin directory of other versions of the Xtensa tools included in the system path. Check the settings of PATH, such as the profile file. Then re-open a new terminal. Sometimes, the temporary settings in the session also cause PATH problems.
There are some problems that need attention:
Current
dsp_batch.xmldefault import and compile project_dsp project. If you need to change the compiled project, target or configuration, change thedsp_batch.xmlfile, or use Xplorer batch build to generate xml file. (refer to Xplorer help: , using batch build)The default Xplorer IDE is
/opt/xtensa/Xplorer-9.0.18/xplorer, setauto_build.shaccording to the actual installation location and Xplorer version.Currently, Xplorer on the server side creates a new workspace (
<sdk root>/dsp/auto_ws) and imports the project into the new workspace for compilation. The script will automatically empty and re-import projects, otherwise the project modification on the local Xplorer cannot be synchronized.Since auto build clears auto_ws workspace every time, so it is fully compiled every time.
We recommend to modify project with Xplorer GUI. However, if there is no GUI but the project must be modified, we provide a temporary solution: directly edit <dsp sdk>/project/project_dsp/.project file.
Add a new virtual folder:
<link>
  <name>TestFolder</name>
  <type>2</type>
  <locationURI>virtual:/virtual</locationURI>
</link>
Add a file to the virtual folder:
<link>
  <name>TestFolder/test_file.c</name>
  <type>1</type>
  <locationURI>PARENT-2-PROJECT_LOC/testfolder/test_file.c</locationURI>
</link>
Note
Modify project configuration (e.g. modify compilation options, add and delete files, etc.), a GUI Xplorer IDE is required.
On linux server, the Xplorer GUI window can be displayed on the local terminal using the X11 protocol.
The method is as follows: Check the contents of /etc/ssh/sshd_config. In this file flag X11Forwarding should be set to yes. Then:
>> sudo apt-get install dbus-x11
>> /opt/xtensa/Xplorer-9.0.18/xplorer
Xplorer’s GUI window will pop up on the local computer. Set the workspace as <dsp sdk>/project.
Compiling Project and Downloading Image
The way of using project_dsp on Windows or Linux GUI Xplorer are very similar to each other. Here, we use the building process on Windows as an example.
Building Project with CMD (Linux)
On a Linux server, you can run auto_build.sh to compile the default project.
cd project/auto_build/
chmod +x auto_build.sh
./auto_build.sh
Image path: project/image/dsp_all.bin
The configuration file for the automatic compilation script is project/auto_build/dsp_batch.xml.
In this script, you can modify the project configuration (HIFI5_PROD_1123_asic_wUPG or HIFI5_PROD_1123_asic_UPG).
Note
Add the Xtensa Tools directory to your system PATH. In our case, it is /opt/xtensa/XtDevTools/install/tools/RI-2021.8-linux/XtensaTools/bin.
Building Project with Xplorer GUI
Importing Project to Workspace
Click Browse to set the workspace to
<dsp_sdk>\project.
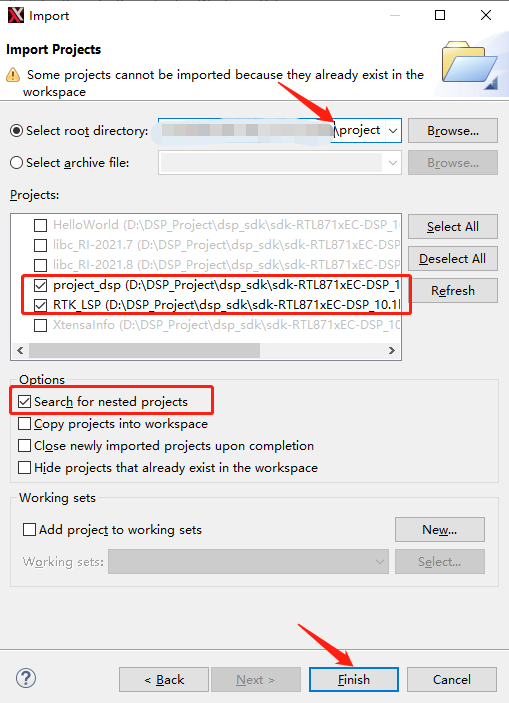
You will find a HelloWorld project added to the Project Explorer automatically after going over all steps in the previous chapters. Now let’s add project_dsp included in the SDK into the workspace.
Click , then click

Set contents in the read box as above, and click Finish.
Building Project
In the upper part of Xtensa Xplorer, set P to project_dsp, C to HIFI5_PROD_1123_asic_UPG (or HIFI5_PROD_1123_asic_wUPG), T to Release, then click Build Active.
The generated image will be placed under project\image, the name of the image is dsp_all.bin.

Here are some useful scripts:
By default, when generating DSP firmware, the corresponding disassembly will not be generated. If disassembly is required to debug the code you need to enable it in the post processing script
<dsp_sdk>/project/img_utility/code_analyze.py: set ENABLE_Disassembler to 1. Generating disassembly may slow down the compile process, so only enable disassembly when necessary. The generated ASM file is<dsp_sdk>/project/image/project_dsp.asm.To check function or data location, you can view the map file generated by the connector:
For Xplorer-GUI:
<dsp_sdk>/proiect/proiect_dsp/bin/HIFI5_PROD_1123_asic_UPG/Release/proiect_dsp.mapFor Linux command line:
<dsp_sdk>/auto_ws/proiect/dsp/bin/HIFI5_PROD_1123_asic_UPG/UPG/Release/project_dsp.map
Note
Add the Xtensa Tools directory to your system PATH. In our case, it is
C:\usr\xtensa\XtDevTools\install\tools\RI-2021.8-win32\XtensaTools\bin.Make sure you have permissions to the files in the image and img_utility folder.
Install python and add its path to environment variable to make sure that post-processing works well. Any version newer than 3.8.0 should be fine. And we use python as the command, you may have to change the command if your command is python3 or python3.8.
Enabling DSP in KM4 Core
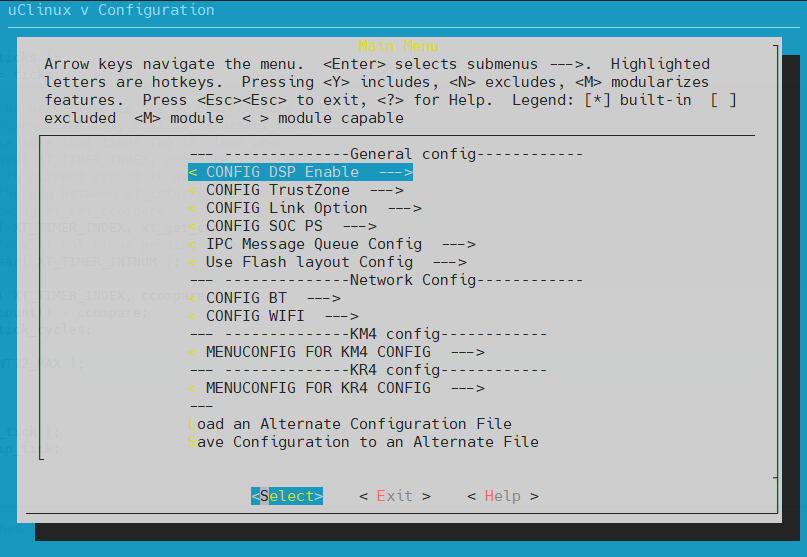
By default, the DSP is not enabled. It requires KM4 core to power it on.
Enable DSP core in SDK menuconfig:
cd {SDK}/amebalite_gcc_project
make menuconfig

Downloading Bin Files
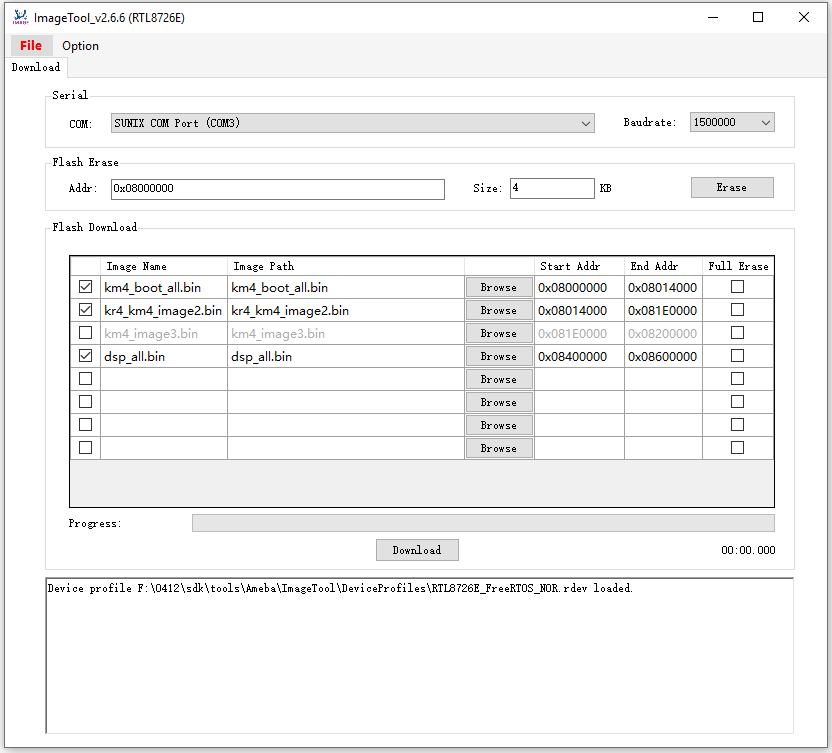
Currently, we support two Flash partitions for downloading DSP image via Realtek ImageTool:
Download the DSP firmware and MCU application firmware separately.
This method is convenient for development. The image names are shown in the following figure, and the image address refer to the DSP IMG Physical address in Flash Layout table.
Combine DSP firmware and MCU application firmware into one firmware then download together.
This method is convenient for OTA upgrade. For details, refer to the of OTA section.
Reset the board after download process is over.
You should see Hello DSP World from a UART tool.
Note
The Hello DSP World message may mixed with messages printed out by KM4/KR4. You can print more messages from DSP to see it clear.
Troubleshooting
Problem: python is not recognized as an internal or external command.
Solution: Maybe python as an environment variable, if this is the case, add python as an environment variable.
Maybe the path where python.exe (Windows) or python.bin (Linux) is not added to your environment variable. In this case, add the path as an environment variable should solve the problem.
And we find another problem rarely occurs in our experiment: on some pc, we have to python3.8 to run python in command (Windows) or terminal (Linux). Typing python will report the same error. Maybe python.exe or python.bin is renamed as python3.8. You can create short cut named python pointing to python3.8.exe on Windows, or create a soft link on Linux. Suppose python3.8.bin is installed under usr/bin, type sudo ln -s python3.8 python on Linux.
Adding Folder or Files into Project
We use virtual folder to manage project files. When using virtual folder, you delete files from your project, but the one on your disk remains intact. And it won’t copy files to your project folder. Suppose our application files test1.c and test2.c are placed in a folder named application, we add these files to our current project.

Create a virtual folder named application. Right click on project_dsp, then select .
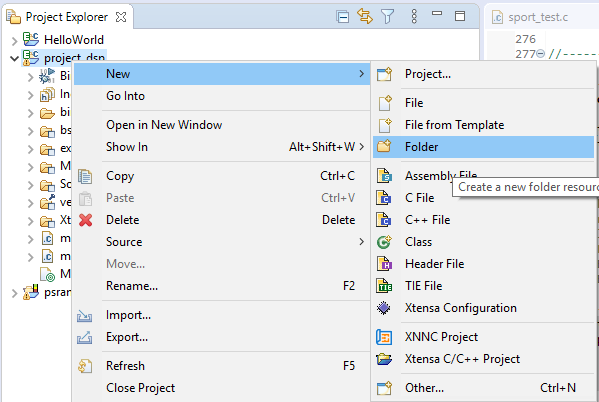
Fill the Folder name with
application, choose Folder is not located in the file system, and then click Finish.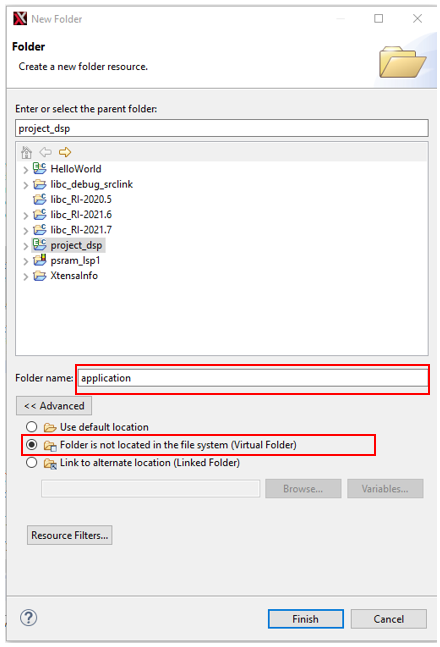
Right click on application, and choose Import.
Click .

In place 1, browse to the address of your folder. In place 2, choose the files you want to include. Click Advanced and tick the place 3.
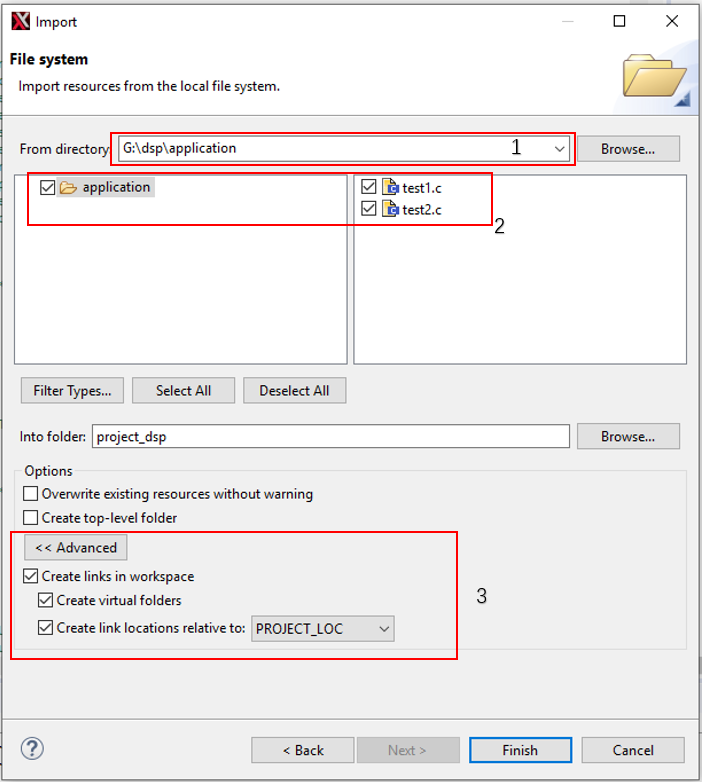
Caution
When adding project files, be sure to use relative paths. As shown in the figure above, click Create link locations relative to: and set it to PROJECT_LOC.
Setting the Project
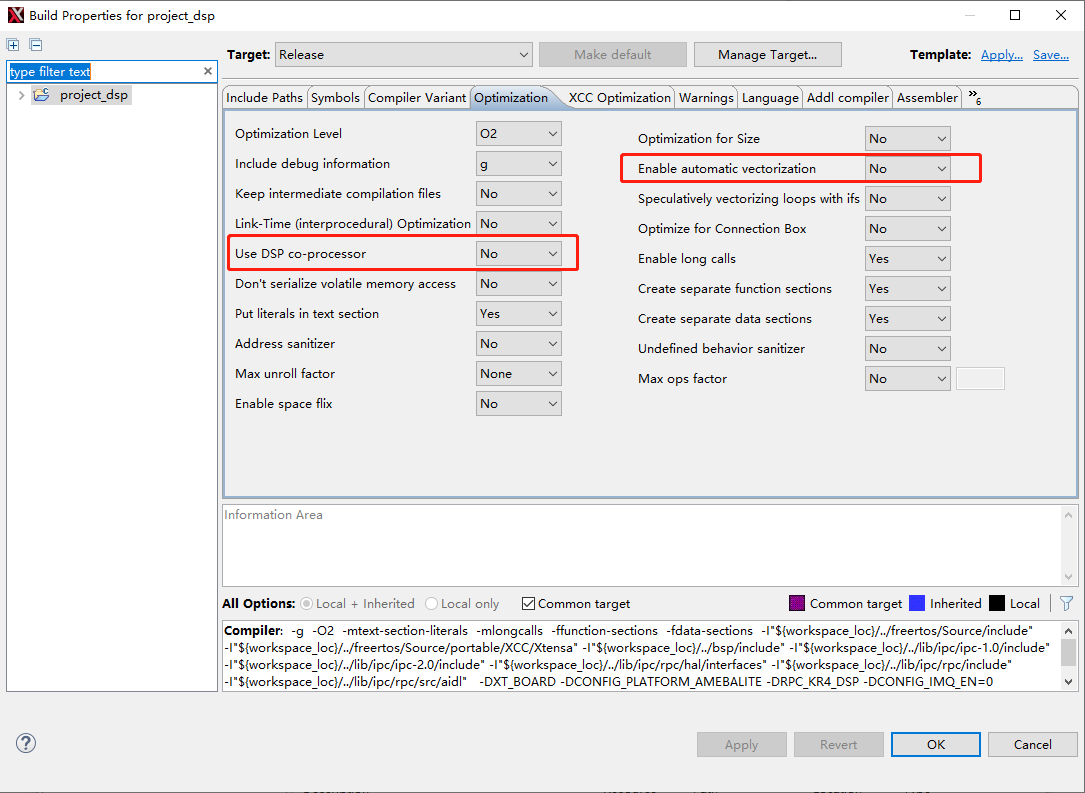
Optimizing DSP Code Considerations
Co-processor, O3 and SIMD compilation options can greatly improve the utilization of DSP hardware resources. But these options are not available for all codes. With -O3 option, the compiler may significantly adjust the order of execution. This option is generally safe, but there is a small chance of problems. Some RTOS source files and other ISR handlers cannot use co-processor and SIMD vector options, such as -LNO:simd and -mcoproc.
Reducing DSP Image Size
Sometimes our code would define some functions and functions that are temporarily unused. Although we do not use these functions, they often waste our ROM and RAM space. In order to solve this problem, we recommend some compile and link parameters:
Add
-ffunction-sectionsand-Osoption to compiler:

Add
-Wl,-gc-sectionslinker option: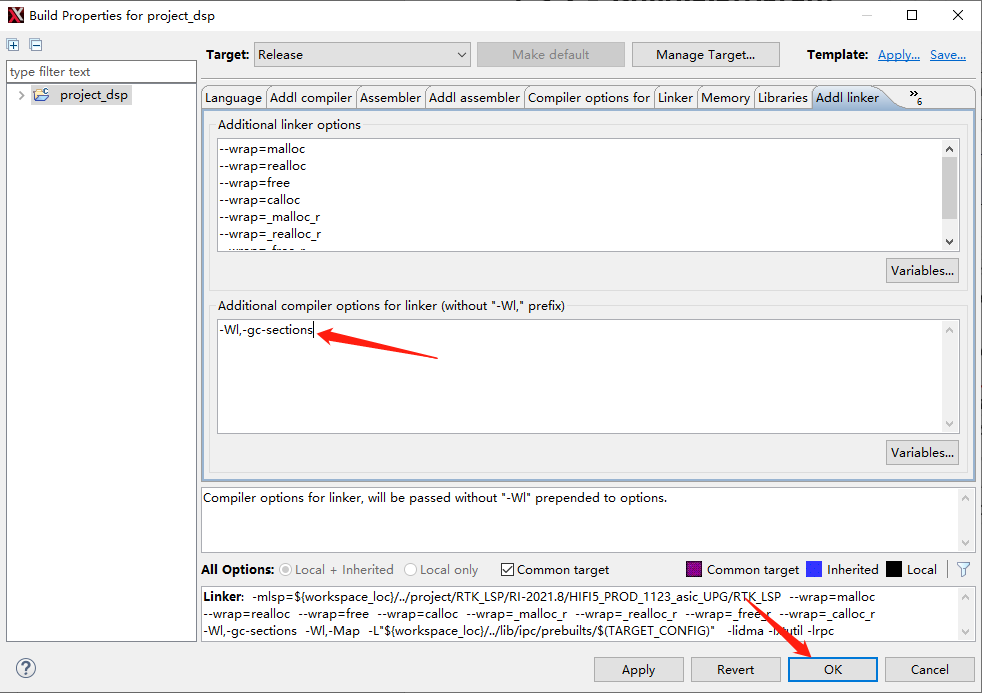
This approach may encounter the following warnings (which can be ignored):
ld: warning: The min-sizing binary cannot be generated if -gc-sections is specified.
In this case, the contents of the .command and .ipc_table sections cannot be loaded into the image because they are not explicitly called. In the link script
RTK_LSPldscriptself32xtensa.x, add KEEP attribute to these two segments..ipc_table : ALIGN(4) { _ipc_table_start = ABSOLUTE(.); KEEP(*(.ipc_table)) . = ALIGN (4); _ipc_table_end = ABSOLUTE(.); } >psram0_seg :psram0_phdr .command : ALIGN(4) { _command_start = ABSOLUTE(.); KEEP(*(.command)) . = ALIGN (4); _command_end = ABSOLUTE(.); } >psram0_seg :psram0_phdr
Note
This linker script is overwritten after each modification of the LSP. The script needs to be reworked.
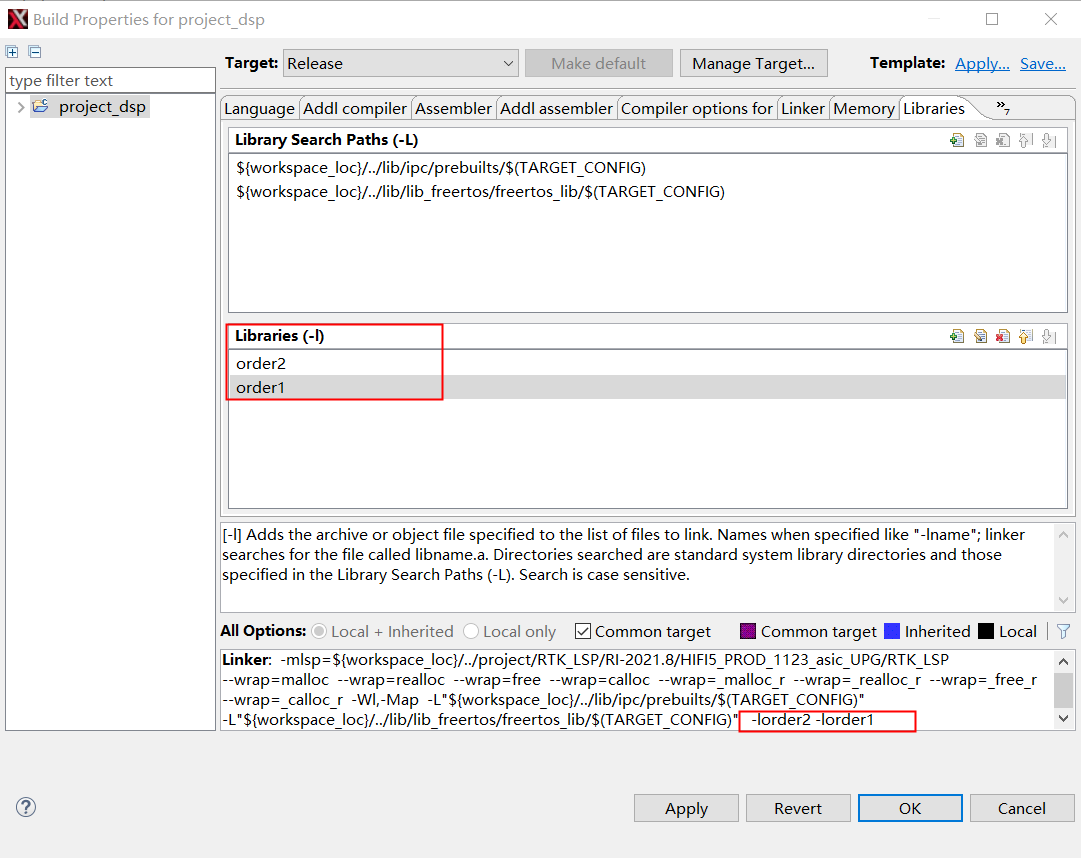
Library Order
When linking static libraries, if there are dependencies between multiple static libraries, there will be link order problems between the dependent static libraries. This needs to be paid attention to when using a static library, otherwise a link error that the symbol cannot be found will be reported.
For example, liborder2.a depends on liborder1.a, and the final executable test depends on liborder2.a, the link options should be -lliborder2.a -lliborder1.a, otherwise it will report that some symbols in liborder1.a are undefined.
Debugging DSP Program
Make sure you have read section 1.2.3 before moving on. At this moment xt-ocd supports J-Link probe over Serial Wire Debug (SWD) for this DSP. You need to first install the J-Link driver. The version we use here is V6.44. Any newer version should be ok, but we haven’t tested on them.
Connecting DSP to J-Link
Suppose Xtensa OCD Daemon is installed under the path: C:\Program Files (x86)\Tensilica\Xtensa OCD Daemon 14.08.
Replace your topology.xml under the path C:\Program Files (x86)\Tensilica\Xtensa OCD Daemon 14.08 (for Linux, the file path is /opt/Tensilica/xocd-14.08/topology.xml) with the flowing code, then Change the usbser value according to your own J-Link S/N.
<configuration>
<controller id='Controller0' module='jlink' usbser='XXXXXX' type='swd' speed='4000000' locking='1'/>
<driver id='XtensaDriver0' dap='1' xdm-offset='0x80000000' module='xtensa' step-intr='mask,stepover,setps' />
<chain controller='Controller0'>
<tap id='TAP0' irwidth='5' />
</chain>
<system module='jtag'>
<component id='Component0' tap='TAP0' config='trax' />
</system>
<device id='Xtensa0' component='Component0' driver='XtensaDriver0' ap-sel='3'/>
<application id='GDBStub' module='gdbstub' port='20000'>
<target device='Xtensa0' />
</application>
</configuration>
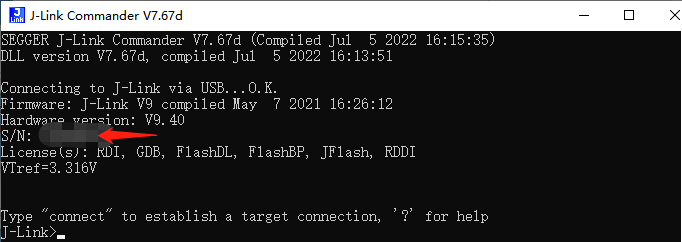
Make sure that the bypass-fastmem are consistent with the above example. You can find usbser in your J-Link commander:
Using Xplorer GUI to Debug the Program
When using Xplorer to debug DSP core, we recommend to erase full flash first then ONLY download KM4/KR4 image. DSP image will directly load into PSRAM by J-link when starting debug.
Press Debug Configurations…
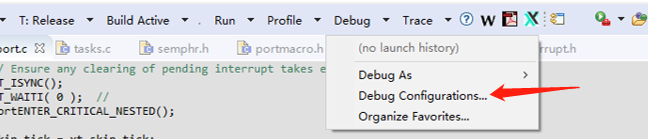
Select Xtensa On Chip Debug, then create a new debug configuration.
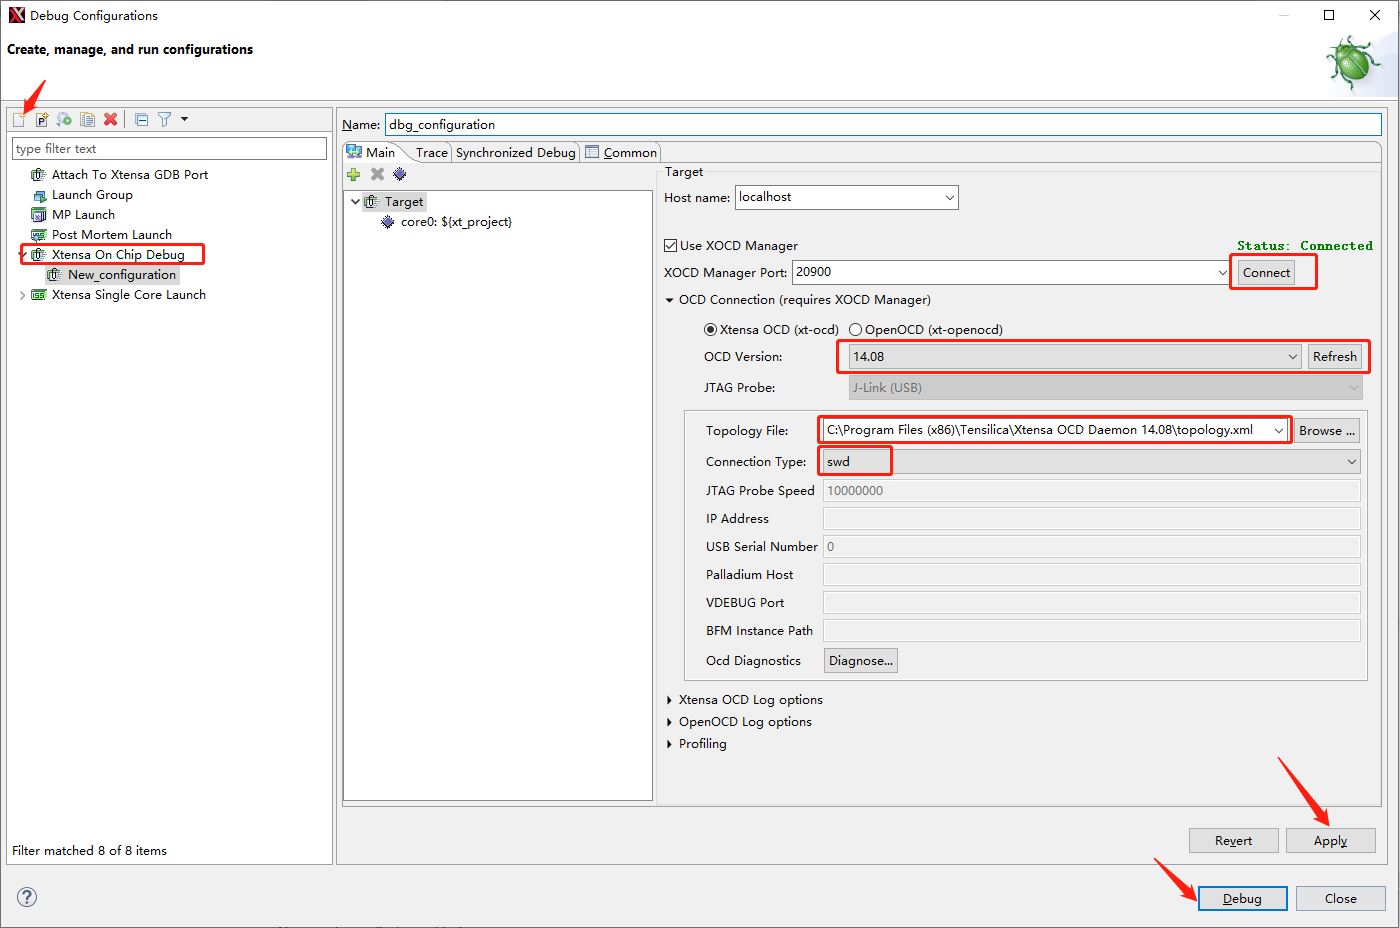
Check Use XOCD Manager option, then click on Connect button. Refresh OCD Version, then select 14.08 version. Topology File should choose
C:Program Files (x86)TensilicaXtensa OCD Daemon 14.08topology.xmlwhich we edited in the last section. Connection Type is SWD.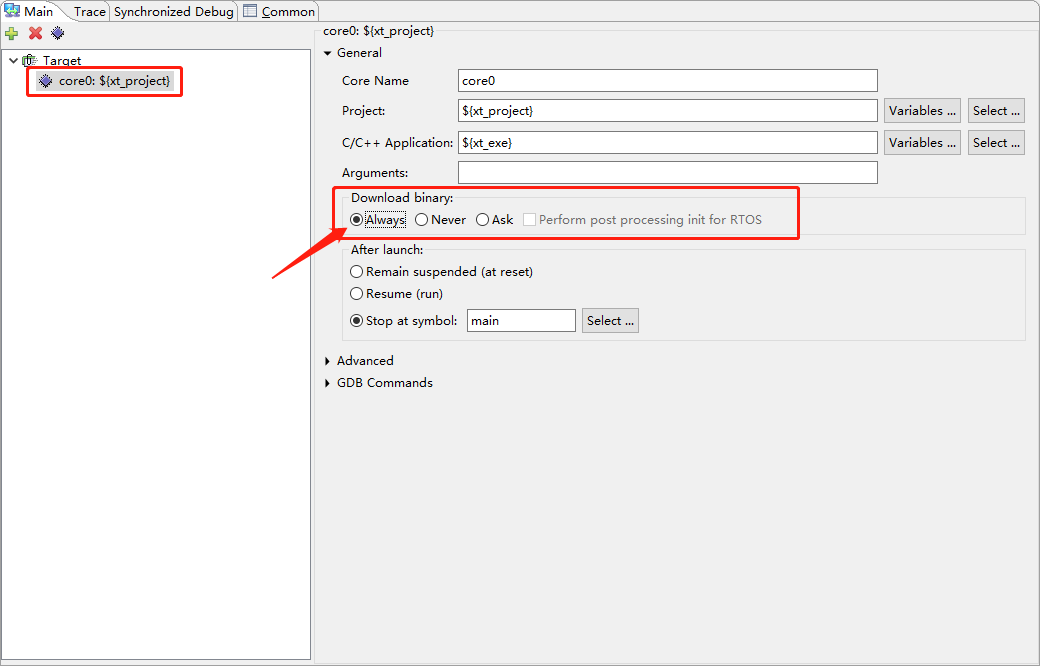
Select core0, then set Download binary to Always. Then Press Apply and Debug. By default, DSP core will stop at the first line of main function.
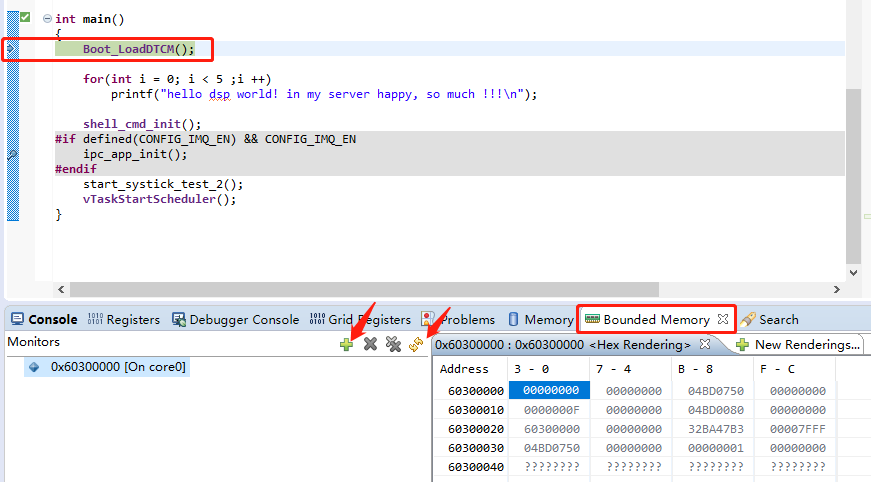
If you need to check memory value, we recommend to use the Bounded Memory and manually refresh the memory table when memory value change.
Note
If the flowing GDB Error happens, reset MCU or repower the MCU board.
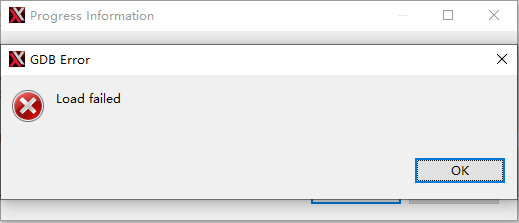
In the Linux environment, the operation steps are the same.
Using xt-gdb to Debug the Program
Open a command prompt window, and change the directory to
C:\Program Files (x86)\Tensilica\Xtensa OCD Daemon 14.08Run
xt-ocd -c topology.xml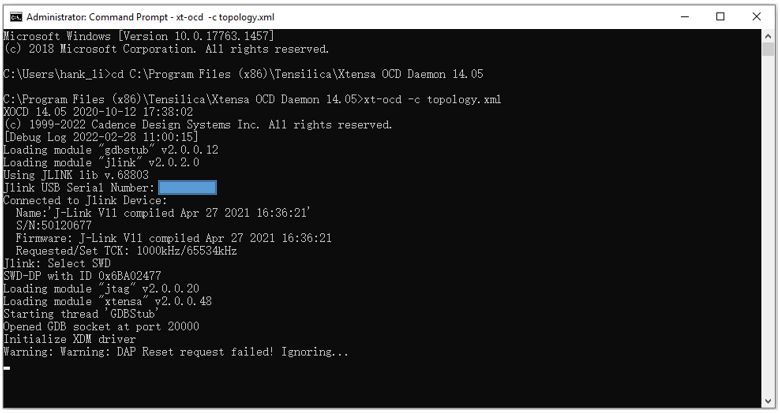
Note
Some warning messages are expected and can be ignored. If you receive an error initializing the XDM driver, you may need to initialize and start the DSP core before debugging. Under <dsp_sdk>\project (or auto_ws)\project_dsp\bin\HIFI5_PROD_1123_asic_UPG\Release, there is a project_dsp file.
Copy it to
C:\usr\xtensa\XtDevTools\install\tools\RI-2021.8 -win32\XtensaTools\binfolder.Open a Command Prompt window, and change the directory to
C:\usr\xtensa\XtDevTools\install\tools\RI-2021.8-win32\XtensaTools\bin. CMD for CALL0 configuration as follows:xt-gdb --xtensa-core=HIFI5_PROD_1123_asic_UPG project_dsp target remote localhost:20000 reset load
Now, you can start debug as you like. Here are some debug tips:
If the debug port cannot be connected all the time, it may be because the SWD port is closed (SWD port is used as normal GPIO). Enter the command
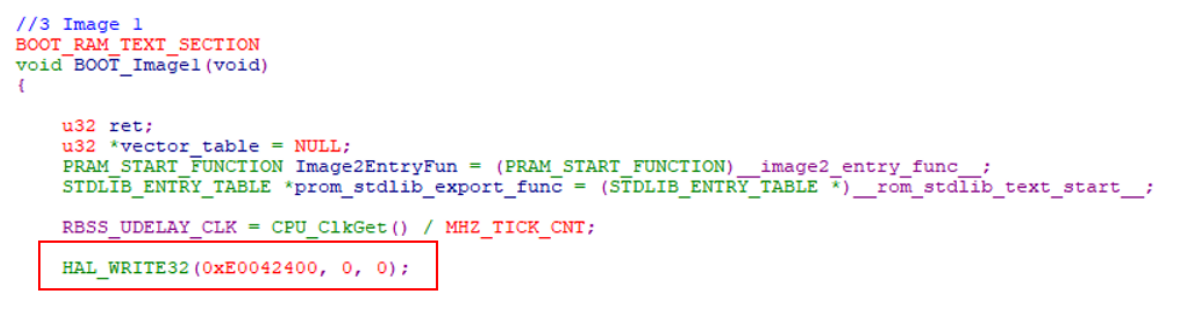
DW 4100C9F4to check SWD enable register via Realtek Tracetool. If the output log is4100C9F4: 00000008, it means the SWD port is closed. Open it with commandEW 4100C9F4 9.By default, KM4/KR4 will stop when you start debugging DSP. If you need to debug DSP with KM4/KR4 at running status, you have to change a register value in KM4 bootloader:
component/soc/amebalite/bootloader/bootloader_km4.c). Add the code in the red box at the corresponding position inBOOT_Image1()function:HAL_WRITE32(0xE0042400, 0, 0);
By default, when compiling DSP project, the corresponding disassembly will not be generated. If disassembly is required, you need to enable it in the post-processing script (
<dsp_sdk>project/img_utility/code_analyze.py): Set ENABLE_Disassembler to 1. The generated ASM file is<dsp_sdk>projectimageproject_dsp.asm.For Linux, the debug steps are the same. Pay attention to the path of the executable file. We recommend adding these to PATH:
/opt/Tensilica/xocd-14.08
/opt/xtensa/XtDevTools/install/tools/RI-2021.8-linux/XtensaTools/bin
If you use the
auto_build.shto build the project rather than Xplorer, you can file the project_dsp elf file in:<dsp_sdk>/auto_ws/project_dsp/bin/<configuration_name>/Release
For more debug guide, refer to xtensa_debug_guide.pdf and gnu_gdb_ug.pdf.
DSP ISS Simulation
Using the Instruction Set Simulator (ISS) for program analysis (profile) can help developers quickly locate performance bottlenecks in the performance tuning phase, thus optimizing the algorithm architecture.
Special reminder:
IPC communication is not supported, only single DSP simulation is available
The pure Computing Power of ISS simulation is basically as same as the real chip (for example, the data/code is in the cache). The memory characteristics of Cache and DTCM are obtained from the configuration to ensure ISS accuracy. However, since the system memory only supports parameters of PSRAM or SRAM, the ISS system memory model can only be configured as PSRAM or SRAM. Differences in memory models can introduce performance errors. According to different program characteristics, the simulation error is generally within 10%, and the maximum is about 20%.
Because most Xplorer licenses only support cycle accuracy simulation, when perform large project simulation, the simulation process will be relatively long. (You can firstly run a quick simulation to verify whether the simulation process is correct or not)
It is recommended to use GUI interface for simulation. If Xplorer is installed on a Linux server, you can open the X11 remote GUI of the server for use. The simulation parameters of SRAM and PSRAM are as follows: (By default, code/data are in PSRAM)
Item |
SRAM read |
SRAM write |
PSRAM read |
PSRAM write |
|---|---|---|---|---|
Memory Waitstates (cycles) |
16 |
2 |
28 |
28 |
Repeat Block Waitstates (cycles) |
2 |
2 |
8 |
8 |
Compiling Project
Modify the content of the LSP specs file (
<dsp sdk>\project\RTK_LSP\RI-2021.8\HIFI5_PROD_1123_asic_UPG\RTK_LSP\specs)*startfile: crt1-sim%O%s crti%O%s crtbegin%O%s _sharedvectors%O%s _vectors%O%s *endfile: crtend%O%s crtn%O%s *lib: -lc -lsim -lc -lhandler-reset -lhandlers-sim -lhal -lc
Edit the code and add the
exit()simulation exit function, for example:#include <xtensa/sim.h> ... int main() { ... // xt_iss_client_command("isa_profile", "enable"); // xt_profile_enable(); // "Start with counting off" Option app_example(); // xt_profile_disable(); exit(1); ... }
Recompile the project:

Simulation Configuration and Start
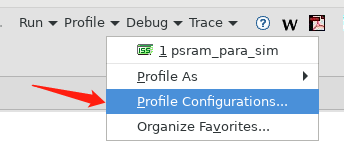
Press on the toolbar:
Rename the simulation task name according to your needs, and check the required functions in the Profiling Mode Options column.
Among them, Enable ISA profiling needs to be checked. Start with counting off with the prompt function can control the start and end position of the program segment that needs to count profile information, otherwise it will count all the codes from power on to
exit().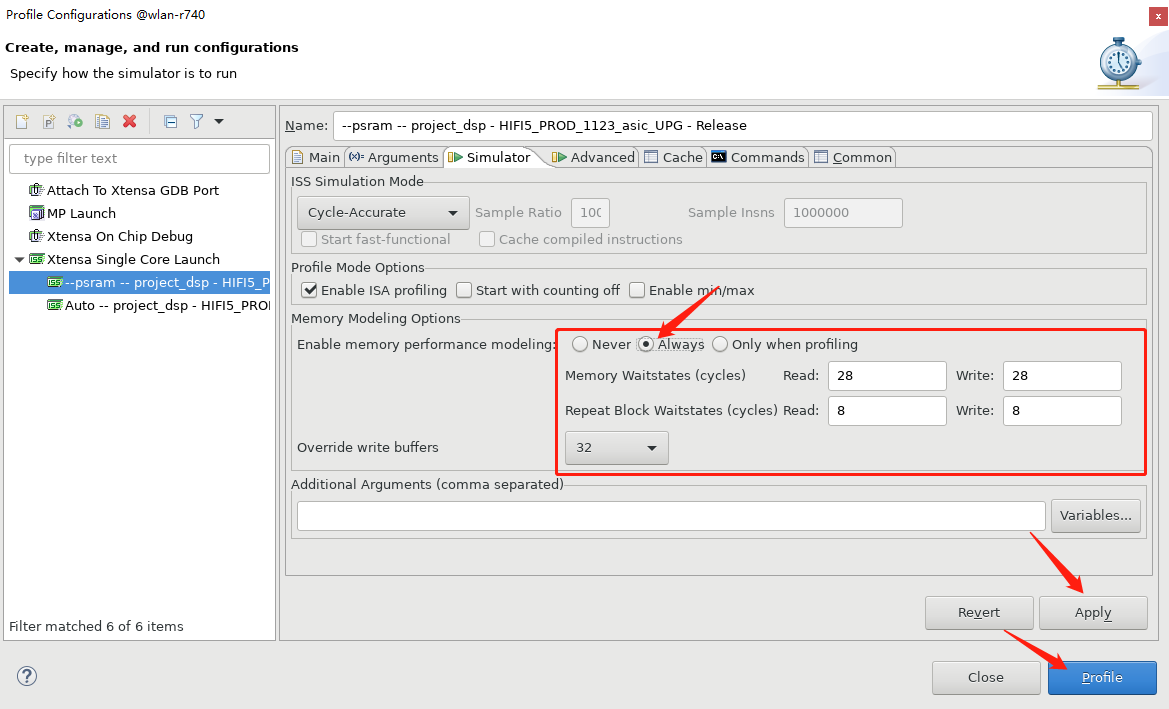
Click Apply and Profile to start the simulation.
Note that the Start with counting off option prompt window in the picture below is wrong (without the final “s”).
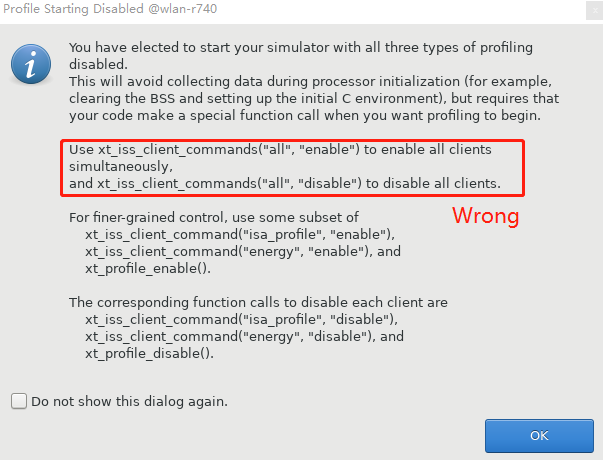
It should be:
xt_iss_client_command("all", "enable")
You can also click the setting in the figure below to start simulation. Note that you cannot directly click the profile button in the toolbar, otherwise there is no memory delay model by default.

There are various statistical results in the tab bar of the simulation window:

CMD Simulation
After the simulation is completed, you can click Console below to view the Xplorer simulation instructions, such as:

Save this command, for example:
/opt/xtensa/XtDevTools/install/tools/RI-2021.8-linux/XtensaTools/bin/xt-run --xtensa-core=HIFI5_PROD_1123_asic_UPG --xtensa-system=/opt/xtensa/XtDevTools/install/builds/RI-2021.8-linux/HIFI5_PROD_1123_asic_UPG/config --xtensa-params= --console --mem_model --wbsize=32 --mlatency=28 --blockrepeat=8 --write_delay=28 --write_repeat=8 --summary --client=<dsp sdk>/project/project_dsp/bin/HIFI5_PROD_1123_asic_UPG/Release/_gen_d/profile/--psram_--_project_dsp_-_HIFI5_PROD_1123_asic_UPG_-_Release/p_10/iss.clientcmds --vector=1 --alt_reset_vec=0x60301000 <dsp sdk>/project/project_dsp/bin/HIFI5_PROD_1123_asic_UPG/Release/project_dsp
You can use the above command for simulation. But it should be adjusted according to the actual project configuration and path. Note that if you use the auto_build.sh script to compile the project_dsp on linux, you need to modify the xt-run command according to the actual situation. For example, auto_build.sh will copy the project to the <dsp sdk>/auto_ws directory and then compile it. The last parameter in CMD (/home/miles_wang/dsp_sdks/20230216_ISS_SIM/dsp/project/project_dsp/bin/HIFI5_PROD_1123_asic_UPG/Release/project_dsp) needs to be modified accordingly.
Profile with RTOS Considerations
At present, the profile method provided by Xplorer is not perfect for handling exceptions and interrupts function calls. Generally, algorithm tuning can also be independent of the RTOS system. Therefore, Cadence does not recommend profiling in RTOS system.
If users have special requirements: profile must be performed in the RTOS system, we have the following suggestions:
Prevents context switches and servicing of ISRs during profiling.
Before entering the profiling statistics section, complete a lazy switch. Because the task switching of RTOS does not change the co-processor register. A co-processor register exception will only be generated when the task uses these DSP registers.
Examples are as follows:
void profiling_task(void)
{
int start, end;
vTaskEnterCritical();
co_processor_func(test_array); // this function uses DSP co-processor registers  start = xthal_get_ccount();
xt_iss_client_command("isa_profile", "enable");
xt_profile_enable();
for (int i = 0; i < 1000; ++i) {
co_processor_func (test_array);
}
xt_profile_disable ();
end = xthal_get_ccount();
vTaskExitCritical();
printf("%d cycles\n", end-start);  // output: 314313 cycles
exit(1);
}
The result of profiling is as expected:
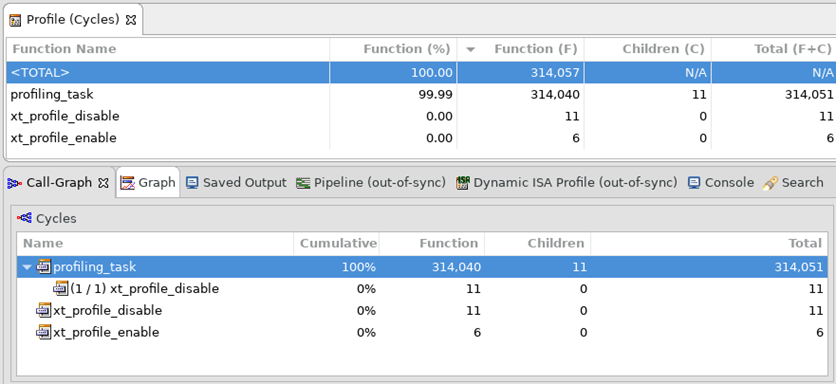
If we cancel the first call of co_processor_func(), you will find that some exception handlers have appeared. Xplorer will have problems with the statistics of these handles:
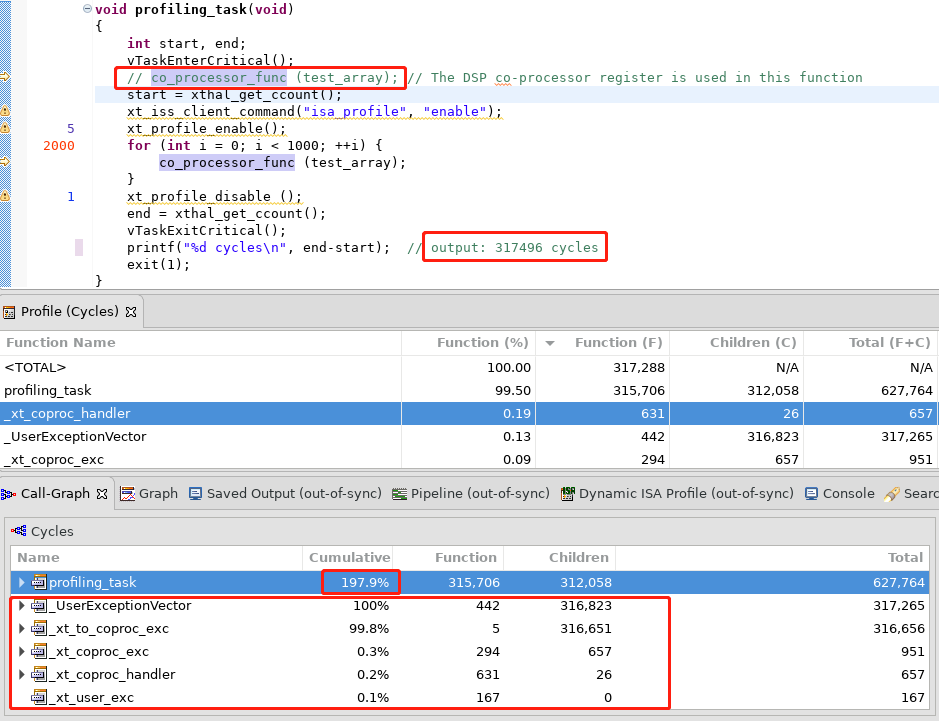
Profile (Cycles) table is correct, but in the Call-Graph table statistical error occurred.
Reference Document
For the specific ISS simulation method, refer to the Xtensa document (inst_set_sim_ug.pdf) in the Xplorer installation directory.
For the profiling result analysis, refer to gnu_profiler_ug.pdf.