Introduction
This document introduces how to use Ameba 1-N MP ImageTool to download images for several boards simultaneously.
Ameba 1-N MP ImageTool UI
The tool will first download the flashloader code into SRAM, then the flashloader will handle the subsequent image download to Ameba Flash.
Environment Setup
Hardware Setup
To download images for several boards simultaneously, the equipments listed below are necessary.
DUT (Ameba device with LOGUART interface and UART_DOWNLOAD button)
USB hub & micro USB cable
PC with 1-N MP ImageTool installed

Hardware setup
Note
If using external UART to download images, USB to UART dongle must be used.
Software Setup
Environment requirements: EX. Winows XP, Winows 7 higher, Microsoft .NET Framework 3.5
Software location:
Ameba_1-N_MP_ImageTool.exe:{SDK}/tools/ameba/MP_ImageTool_1_N/Ameba_1-N_MP_ImageTool.exeDeviceProfiles:{SDK}/tools/ameba/DeviceProfiles
Note
To download images through UART interface, the host driver for USB to UART adapter (e.g. PL2303GC) on the board shall be installed first, please find the exact driver from the official website of corresponding vendor of the USB to UART adapter.
Do not modify or delete
floader_amebaxxx.binfiles, because they are flashloader binary files.
Image Download
This tool can work in Windows Form Mode and Command Line Mode. The following sections introduce each mode.
Before image download, DUT must enter UART_DOWNLOAD mode. The method is:
Connect
LOGUART Txpin to GND. If UART_DOWNLOAD button exists, push it down and keep it pressed.Power on the board again, or press the Reset button.
Connect the
LOGUART Txpin back, or release the UART_DOWNLOAD button.
Now, DUT gets into UART_DOWNLOAD mode, and you can use this tool to download images.
GUI Mode
Download Flow
The steps to download images in normal mode are as follows:
Double click
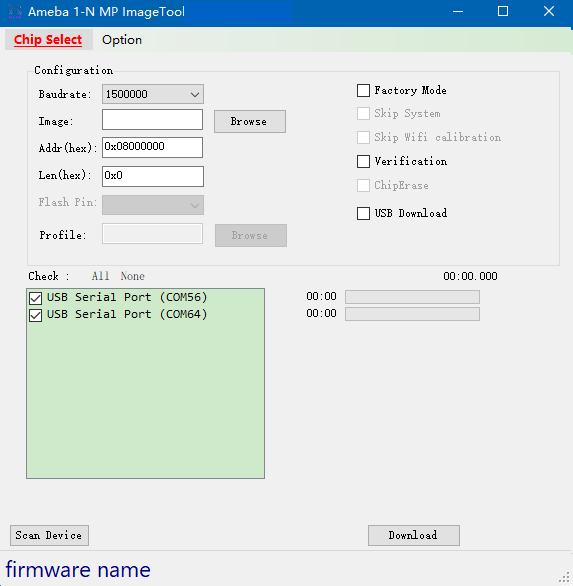
Ameba_1-N_MP_ImageTool.exe.Click to select DUT type.
Set the Configuration
- Baudrate:
Select the baudrate for image download, default value is 1500000.
- Image:
Click Browse button to choose the target image file.
- Addr(hex):
Input the destination address to download.
- Leg(hex):
Input image length to download, and it will fill when selected target image file.
Note
Once the chip is selected, some button/checkbox is gray and unable to be accessed, it means that the function is not supported for the selected IC.
Click Scan Device button, the detected devices are listed in the box.
If USB Download is checked, the devices detected and shown in the box are
USB COMs.If USB Download is not checked, the devices detected and shown in the box are
LOGUART COMs.
Note
If some devices are not present immediately, check if the driver is still installing and wait until the installation is finished. This situation is usually encountered when DUT is plugged into PC the first time.
Tick in the checkbox to select the target devices.
Get the DUTs into UART_DOWNLOAD mode.
Click Download button.

Ameba 1-N MP ImageTool operation
Once click Download button, image download starts.
If the image download is in process, as the following figures show, a light bulb shows up at the end of each progress bar, and a stopwatch measures the elapsed time. When image download is finished, a green tick shows up.
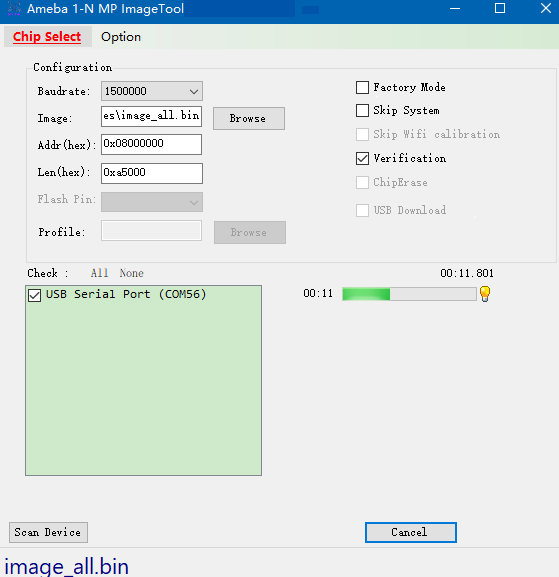
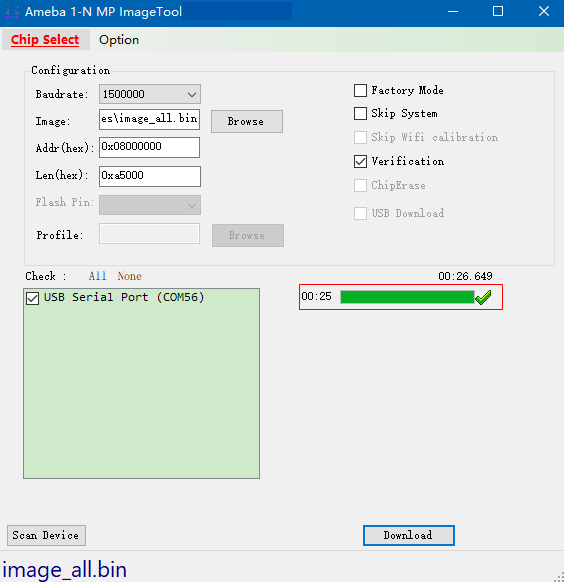
Image download is ok
If some typical troubleshootings occur, refer to Section Troubleshooting for help.
Optional Functions
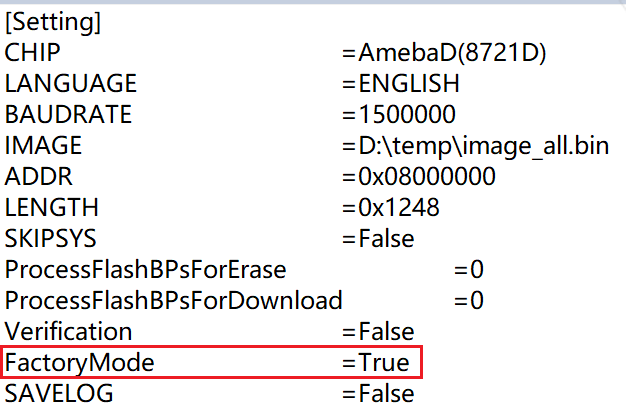
Factory Mode
If Factory Mode is enabled, the UI disables some functions. The configuration parameters are saved to Setting.ini and reloaded when the tool restarts the next time.
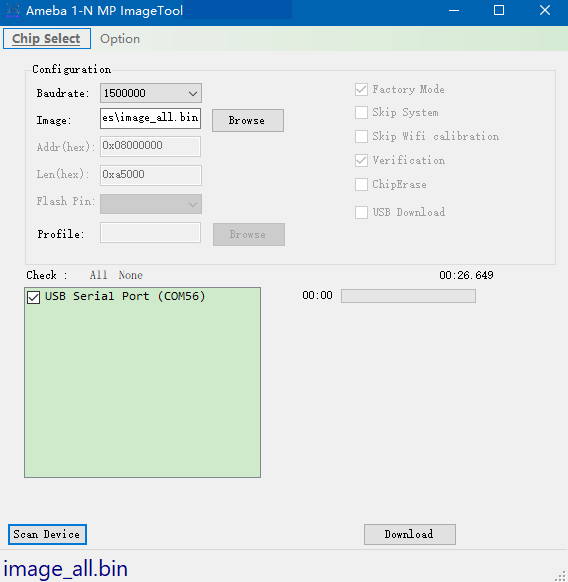
Factory Mode
There are two ways to exit the factory mode:
Close the tool.
Delete
Setting.ini.Edit
Setting.iniand modifyFactoryModeparameter value to False.
Open the tool again, and the modified parameters will be restored to normal mode.
Parameters modification
Verification
This option means whether to examine the checksum after download finished.
Instruction: Select checkbox Verification in step 3 in Download Flow.
ChipErase
This option means whether to erase chip before download.
Instruction: Select checkbox ChipErase in step 3 in Download Flow.
Skip System
This option means whether to skip system data area or not when downloading image.
Instruction: Select checkbox Skip System in step 3 in Download Flow.
USB Download
This option means whether to download image through USB for NAND flash.
Instruction Select checkbox USB Download in step 3 in Download Flow.
If this option is selected, click Profile Browse button to choose the target profile file.
Skip Wi-Fi Calibration
This option means whether to skip Wi-Fi calibration when downloading images.
Instruction: Select checkbox Skip Wifi calibration in step 3 in Download Flow.
Support for >16MB Flash Download
This option means whether support for >16MB Flash download. This function will help users program OTP bit to enable 4-byte mode to access the Flash.
Instruction: Select Option -> Support for >16MB Flash Download in step 3 in Download Flow.
Remember Flash Protection Process for Erase/Download
When downloading images, it may occurred that the flash protection bit is programmed for protect flash areas, user can select this option function to clear flash protection bit to erase/program flash, and after that finished, tool will revert flash protection bit to origin as they are.
Instruction: Select Option -> Remember Flash Protection process for erase/download in step 3 in Download Flow.
Command Line Mode
Download Flow
This tool can also work in command line mode. Start cmd.exe in Windows and execute Ameba_1-N_MP_ImageTool.exe with defined parameters, and the command line mode supports multi-parameters input with one command after v2.5.11.
The steps to download images in command line mode are as follows:
Select chip type
Set the configuration
Set the chip type
Use
-c/--chip [amebaz|amebad|amebaz2|amebasmart|amebalite|amebadplus]as parameters for target chip set.$Ameba_1-N_MP_ImageTool.exe -c amebaxxx CHIP: AMEBAXXX
Set the baudrate
Use
-b/--baudrate <value>as parameters.$Ameba_1-N_MP_ImageTool.exe -b 1500000 BAUDRATE: 1500000
Note
The value of baudrate only can be set as 115200, 128000, 153600, 230400, 380400, 460800, 500000, 921600, 1000000, 1382400, 1444400, and 1500000.
Set target image path
Use
-i/--image <image_path>as parameters.$Ameba_1-N_MP_ImageTool.exe -i E:\test\image_path\image_all.bin FILE PATH: e:\test\image_path\image_all.bin
Set download start address
Use
-a/--address <value>as parameters.$Ameba_1-N_MP_ImageTool.exe -a 0x08000000 ADDRESS: 0x08000000
Set image length
Use
-l/--length <value>as parameters.$Ameba_1-N_MP_ImageTool.exe -l 0xa500 LENGTH: 0XA500
Double check settings to download
Use
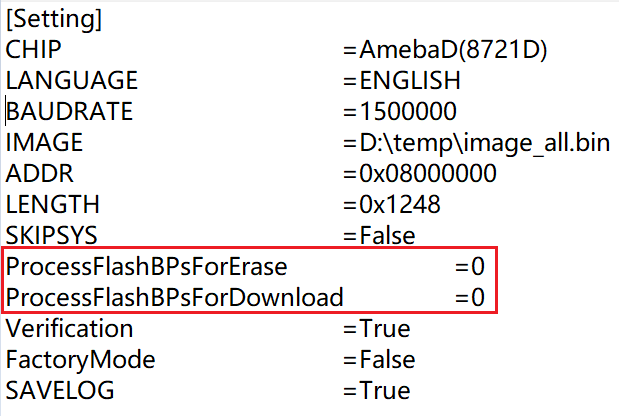
--show settingas parameters to check the tool configuration.$Ameba_1-N_MP_ImageTool.exe --show setting CHIP: AMEBAZ BAUDRATE: 1500000 IMAGE: e:\test\image_path\image_all.bin ADDRESS: 0x08000000 SKIP SYSTEM: False LENGTH: 0x0 ProcessFlashBPsForErase: 0 ProcessFlashBPsForDownload: 0 VERIFICATION: True SAVELOG: True
Note
The configurations need to be done only once before mass production (MP). These parameters would be saved into Setting.ini. When MP starts, the factory can download directly.
Download images
After configuration is finished, use
-d/--download <dev1>or-d/--download addedto download images for devices.-d/--download addedis used to download images for all devices specified by--add devicecommands.$Ameba_1-N_MP_ImageTool.exe -d added
-d/--download <dev1>is used to download images for a specified device without modifying the device list.$Ameba_1-N_MP_ImageTool.exe -d COM4 COM5 1 COM4 SUCCESS 2 COM5 SUCCESS
Note
After v2.5.11, the command line mode supports multi-parameters input when download starts.
$Ameba_1-N_MP_ImageTool.exe -c amebad -b 1500000 -a 0x08000000 -l 0xa500 -i e:\test\image_path\image_all.bin -s true -d COM4 COM5
1  COM4 SUCCESS
2  COM5 SUCCESS
If the print message shows that the download procedure is failed, check the log file located at /log to get the fail reason.
Optional Functions
USB Download
USB download is supported for NAND Flash image download. Set this option function in step 2 in Download Flow.
To select whether to use USB download or not, use -u/--usbdownload [true|false] as parameters.
$Ameba_1-N_MP_ImageTool.exe –u true
USBDOWNLOAD:    True
If USB download is selected, the profile should be set well, use -p/--profile <path> as parameters.
$Ameba_1-N_MP_ImageTool.exe –p E:\MP_Image_Tool\image_all.rdev
PROFILE:  e:\mp_image_Tool\image_all.rdev
Scan Device
Use --scan device as parameters to check serial ports connected to PC.
$Ameba_1-N_MP_ImageTool.exe --scan device
USB Serial Port (COM4)
USB Serial Port (COM5)
Add/Remove/Show Device
Use --add <dev> and --remove <dev> to specify the devices that are needed to download to, and --show device to list the specified device names.
$Ameba_1-N_MP_ImageTool.exe --add COM4 COM5
COM4 added!
COM5 added!
$Ameba_1-N_MP_ImageTool.exe --show device
COM4
COM5
$Ameba_1-N_MP_ImageTool.exe --remove COM5
COM5 removed!
$Ameba_1-N_MP_ImageTool.exe --show device
COM4
If devices are added, the command to download is specified in step 4 in Download Flow.
Verification
To select whether to examine the checksum after download is finished, use -v/--verify [true|false] as parameters.
$Ameba_1-N_MP_ImageTool.exe –v true
VERIFICATION:  True
This option function should be set in step 2 in Download Flow.
Chip Erase
To select whether to erase full chip before download, use -e/--chiperase [true|false] as parameters.
$Ameba_1-N_MP_ImageTool.exe –e true
CHIPERASE:  True
This option function should be set in step 2 in Download Flow.
DtrRtsConfig
If the device supports configuring DtrRts to enter UART download mode automatically, this option will help you. Use -g/--dtrrtsconfig [true|false] as parameters.
$Ameba_1-N_MP_ImageTool.exe –g true
DtrRtsConfig:  True
This option function should be set in step 2 in Download Flow.
Remember Flash Protection Process for Erase/Download
To select whether to remember Flash protection process for erase/download after erase/download is finished, use -f/--processflashbpsforerase | -n/--processflashbpsfordownload <value> as parameters.
$Ameba_1-N_MP_ImageTool.exe –f 1
ProcessFlashForErase:  1
$Ameba_1-N_MP_ImageTool.exe –n 1
ProcessFlashForDownload:  1
This option function should be set in step 2 in Download Flow.
Save Log
To select whether to save log or not, use -s [true|false] as parameters.
$Ameba_1-N_MP_ImageTool.exe –s true
SAVELOG:    True
This option function should be set in step 2 in Download Flow.
GPIO/PWM Indication
The tool supports downloading image through USB for NAND Flash. Since the device and USB port do not have a unique correspondence, the download failed devices cannot be well identified on the production line. If you need to download image through USB, the GPIO/PWM indication function can be used to indicate which devices have successfully downloaded the images, so as to redo the download processes for the failed devices.
According to the configuration parameters, the tool will send the corresponding query to the device, and the device will output high or low level through GPIO or output PWM through PWM channel.
The configuration methods are shown below:
Turn off the running tool first.
Open the
Setting.inifile in the tool directory and configure theProgramConfig(default: 0).Refer to as following table for bit field description of
ProgramConfig.
Bit |
Description |
|---|---|
[63:32] |
Download indication configuration:
|
[31:30] |
Download indication strategy:
|
[29:16] |
Download indication PIN name, refer to the SoC-specific definition of PinName for MBED API
|
[15:2] |
Reserved |
[1:0] |
NAND Flash bit flip fail level:
|
Save
Setting.iniand reopen the tool to download.
Read MAC
Read the MAC of the devices through the command -r/--readmac:
$Ameba_1-N_MP_ImageTool.exe -r COM4
COM4  FF-FF-FF-FF-FF-FF
Combine Images
Use --combine "<image1_path>;<image2_path>" --offset "<image1_offset><image2_offset>" [--output "<image_all_output>"] to combine the images together.
$Ameba_1-N_MP_ImageTool.exe --combine "E:\image1.bin;E:\image2.bin" --offset "0x00000000;0x00004000" --output E:\image_all.bin
Offset0: 0x00000000, Image0: E:\image1.bin
Offset1: 0x00004000, Image1: E:\image2.bin
Images have been combined successfully, size: 12KB, path: E:\image_all.bin
Erase
Use --erase <address> <value> [length] <value>(KB) <dev1> <dev2> to erase the Flash in CLI mode.
$Ameba_1-N_MP_ImageTool.exe --erase 0x08000000 1024 COM56
Flash erase done!
Note
Before erasing the Flash, you should set up the device, such as setting the images, the baudrate, and so on.
CLI Help
The supported parameters can be achieved by typing --help.
$Ameba_1-N_MP_ImageTool.exe --help
Ameba 1-N MP ImageTool 2.5.13.0
Copyright ?  2016
-a ADDRESS, --address=ADDRESS                         Set start download address
-b BAUDRATE, --baudrate=BAUDRATE                     Set download baudrate
-c CHIP, --chip=CHIP                                    Set target chip
-d [COMx COMy COMn|added], --download=[COMx COMy COMn|added]  Target device to download
-e TRUE|FASLE, --chiperase=TRUE|FASLE               Erase chip or not before download
-f PROCESSFLASHBPSFORERASE, --processflashbpsforerase=PROCESSFLASHBPSFORERASE  Process flash BPs for erase or not when download
-g TRUE|FASLE, --dtrrtsconfig=TRUE|FASLE            Set Dtr/Rts config or not
-h FLASHPIN, --flashpin=FLASHPIN                      Set flashpin for download
-i IMAGE, --image=IMAGE                                 Set target image path
-k TRUE|FASLE, --skipsys=TRUE|FASLE                  Skipsys or not when download
-l LENGTH, --length=LENGTH                             Set target image length
-m TRUE|FASLE, --support4bytesaddrmode=TRUE|FASLE          Support 4-byte address mode or not when download
-n PROCESSFLASHBPSFORDOWNLOAD, --processflashbpsfordownload=PROCESSFLASHBPSFORDOWNLO AD      Process flash BPs for download or not when download
-p PROFILE, --profile=PROFILE               Set target device profile path for download
-r [COMx COMy COMn|added], --readmac=[COMx COMy COMn|added]  Target device to read mac
-s TRUE|FASLE, --savelog=TRUE|FASLE                         Save log or not when download
-t CheckFlashAddrModeTimeoutSecond, --checkflashaddrmodetimeoutsecond=CheckFlashAddr ModeTimeoutSecond     Timeout(unit:s) used to pop confirm window for check flash address mode
-u TRUE|FASLE, --usbdownload=TRUE|FASLE       Select usb download or not
-v TRUE|FASLE, --verify=TRUE|FASLE         Set verification or not when download
-w TRUE|FASLE, --skipwifi=TRUE|FASLE       Skip wifi for AmebaZ2
--add=COMx COMy COMn                          Add target device
--remove=COMx                                  Remove target device
--combine=IMAGE1;IMAGE2;IMAGEx             Combine images together
--offset=OFFSET1;OFFSET2;OFFSET3           Images' offset to combine
--output=OUTPUT                                Combined images output path
--erase=addr length COMx COMy COMn         Erase target device at addr with length(KB)
--show=setting|device                         Show setting or device
--scan=device                                  Scan devices
--help                                           Display this help screen
--version                                       Display version information
Common Config
You can change the configuration in Setting.ini.
Note
Close the tool first before changing the configuration below.
Show Detail Log
This option aims to show the detailed logs for users. You can change the configuration in Setting.ini to select whether to show the detailed logs or not.
ShowDetailLog =True
This option function should be set in step 2 in Download Flow.
Download Progress Display
You can set the configuration in Setting.ini to select whether to show progress Bar in console when downloading in CLI mode.
DownloadProgressDisplay =True
This option function should be set in step 2 in Download Flow.
Download image to sram
After v2.5.24, Ameba 1-N MP ImageTool supports to download to sram with mp shrink image. The system will reboot automatically after download successfully and it can response to command through serial port without hard reboot.
And the mp image layout in sram is:
IC |
ImageType |
StartAddress |
EndAddress |
|---|---|---|---|
RTL8721Dx RTL8711Dx |
km4_boot_all.bin |
0x20012000 |
0x2001A000 |
km0_km4_app.bin |
0x2001A000 |
0x20080000 |
|
RTL8726EA
RTL8713EC
RTL8720EA
RTL8710EC
|
km4_boot_all.bin |
0x20012000 |
0x2001A000 |
kr4_km4_app.bin |
0x2001A000 |
0x20080000 |
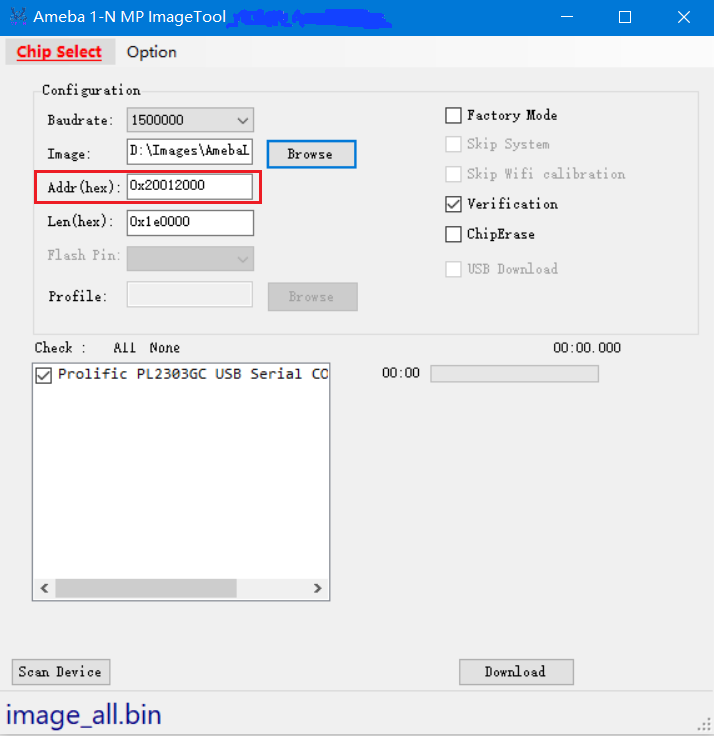
MP shrink image address setting
Troubleshooting
Download Fail
If image download is failed, enter the UART_DOWNLOAD mode to try again.
When transmission interrupts or verification fails, a red error sign shows up, you need to check the error log and try again. There are two ways to get the error messages:
Hover the mouse cursor over the sign, the error message shows up, as following figure shows.
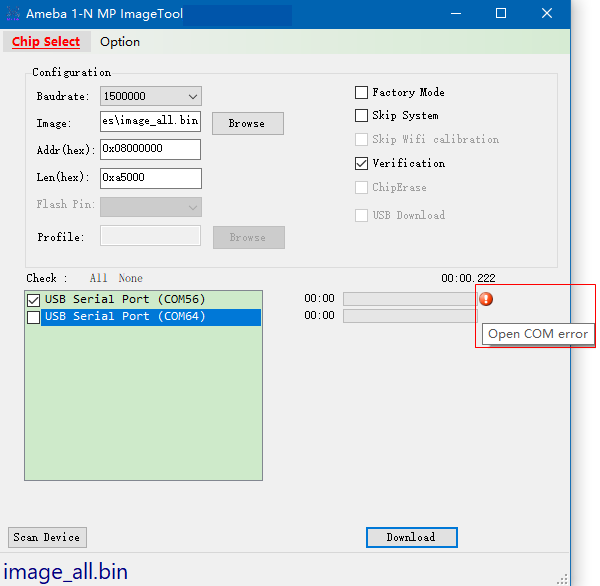
Download is fail
Check the log file which locates at
/log/to get more detailed error messages.Start Tool from UI Scan Device Start Scan Device End Start to Download... COM56 Open COM error
Note
Enable save log function first before download starts.
Flash Write Protected
If Flash is write protected by Flash BPs, that is to say, when Flash block protection is detected during image download or Flash erase, a pop up dialog will guide user to choose the follow-up actions.
You can process Flash BPs for download as needed, as following figure shows.
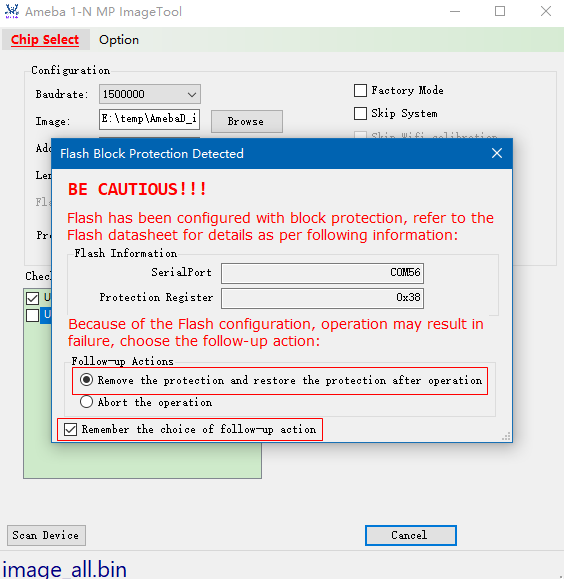
Flash block protection detected
Or set
ProcessFlashBPsForEraseandProcessFlashBPsForDownloadto process Flash block protection bits inSetting.inito avoid download blocked error.
The values of ProcessFlashBPsForErase and ProcessFlashBPsForDownload are:
0: When detect Flash block protection, tool pops new window to ask the customer what to do next when erase/download.
1: Tool will remove the Flash protection and restore the Flash protection when erase/download.
2: Tool will abort erase/download when detect Flash block protection.
Setting.ini
Power-off Accident
If accidents happen when transmission is in progress such as DUT powers off by accident, which cause the download failed, try to enter the UART_DOWNLOAD mode and download again.