Supported ICs
Ameba SoC |
RTL8721Dx |
RTL8726EA |
RTL8720EA |
RTL8730E |
|---|---|---|---|---|
Supported |
Y |
N |
N |
N |
Wi-Fi Bridge Architecture
The following figure is the high-level block diagram for Wi-Fi bridge solution.

Wi-Fi Bridge Interfaces
Interface |
Wi-Fi |
BT |
|---|---|---|
SDIO |
Y |
Y |
SPI |
Y |
Y |
USB |
X |
X |
UART |
X |
X |
SDIO (Wi-Fi) + UART (BT) |
Y |
Y |
SPI (Wi-Fi) + UART (BT) |
Y |
Y |
USB (Wi-Fi) + UART (BT) |
X |
X |
Interface |
Wi-Fi |
BT |
|---|---|---|
SDIO |
Y |
Y |
SPI |
Y |
Y |
USB |
X |
X |
UART |
X |
X |
SDIO (Wi-Fi) + UART (BT) |
Y |
Y |
SPI (Wi-Fi) + UART (BT) |
Y |
Y |
USB (Wi-Fi) + UART (BT) |
X |
X |
Interface |
Wi-Fi |
BT |
|---|---|---|
SDIO |
Y |
X |
SPI |
X |
X |
USB |
X |
X |
UART |
X |
X |
SDIO (Wi-Fi) + UART (BT) |
X |
X |
SPI (Wi-Fi) + UART (BT) |
X |
X |
USB (Wi-Fi) + UART (BT) |
X |
X |
Wi-Fi Bridge Features
Features |
Linux Host |
FreeRTOS Host |
|---|---|---|
Wi-Fi API |
FreeRTOS Wi-Fi APIs |
FreeRTOS Wi-Fi APIs |
Wi-Fi mode |
|
|
Wi-Fi security |
|
|
Wowlan |
Y |
Y |
Bluetooth features |
|
|
Wi-Fi Bridge File Architecture
├─ whc
│  ├─ README.md
│  ├─ whc_def.h
│  ├─ whc_dev
│  │  ├─ ipc
│  │  │  ├─ whc_ipc_dev_api.c
│  │  │  ├─ whc_ipc_dev_trx.c
│  │  │  ├─ whc_ipc_dev_trx.h
│  │  │  └─ whc_ipc_device.c
│  │  ├─ sdio
│  │  │  ├─ whc_bridge_sdio_dev.c
│  │  │  ├─ whc_bridge_sdio_dev.h
│  │  │  ├─ whc_fullmac_sdio_dev.c
│  │  │  ├─ whc_fullmac_sdio_dev.h
│  │  │  ├─ whc_sdio_drv.c
│  │  │  └─ whc_sdio_drv.h
│  │  ├─ spi
│  │  │  ├─ whc_bridge_spi_dev.c
│  │  │  ├─ whc_bridge_spi_dev.h
│  │  │  ├─ whc_fullmac_spi_dev.c
│  │  │  ├─ whc_fullmac_spi_dev.h
│  │  │  ├─ whc_spi_dev.c
│  │  │  └─ whc_spi_dev.h
│  │  ├─ usb
│  │  │  ├─ whc_usb_dev.c
│  │  │  └─ whc_usb_dev.h
│  │  ├─ whc_bridge_dev_api.c
│  │  ├─ whc_bridge_dev_api.h
│  │  ├─ whc_dev.h
│  │  ├─ whc_dev_api.c
│  │  ├─ whc_dev_api.h
│  │  ├─ whc_dev_app.c
│  │  ├─ whc_dev_bridge.c
│  │  ├─ whc_dev_bridge.h
│  │  ├─ whc_dev_cust_evt.c
│  │  ├─ whc_dev_cust_evt.h
│  │  ├─ whc_dev_msg_queue.c
│  │  ├─ whc_dev_msg_queue.h
│  │  ├─ whc_dev_protocal_offload.c
│  │  ├─ whc_dev_protocal_offload.h
│  │  ├─ whc_dev_struct.h
│  │  ├─ whc_dev_trx.c
│  │  └─ whc_dev_trx.h
│  ├─ whc_host_rtos
│  │  ├─ ipc
│  │  │  ├─ whc_ipc_host.c
│  │  │  ├─ whc_ipc_host_api.c
│  │  │  ├─ whc_ipc_host_api.h
│  │  │  ├─ whc_ipc_host_api_basic.c
│  │  │  ├─ whc_ipc_host_api_ext.c
│  │  │  ├─ whc_ipc_host_trx.c
│  │  │  ├─ whc_ipc_host_trx.h
│  │  │  └─ whc_ipc_host_zephyr.c
│  │  ├─ spi
│  │  │  ├─ whc_spi_host.c
│  │  │  ├─ whc_spi_host.h
│  │  │  ├─ whc_spi_host_trx.c
│  │  │  └─ whc_spi_host_trx.h
│  │  ├─ whc_host.h
│  │  ├─ whc_host_api.c
│  │  ├─ whc_host_api.h
│  │  ├─ whc_host_api_basic.c
│  │  ├─ whc_host_api_ext.c
│  │  ├─ whc_host_cust_evt.c
│  │  ├─ whc_host_cust_evt.h
│  │  └─ whc_rtos
│  │     ├─ os_wrapper_memory.c
│  │     ├─ os_wrapper_mutex.c
│  │     └─ os_wrapper_semaphore.c
│  ├─ whc_ipc.h
│  ├─ whc_ipc_cfg.h
│  ├─ whc_ipc_msg_queue.c
│  └─ whc_ipc_msg_queue.h
├─ whc_host_linux
│  ├─ Kconfig
│  ├─ Makefile
│  ├─ fullmac_setup.sh
│  ├─ bridge
│  │  ├─ Makefile
│  │  ├─ whc_bridge_host_api.c
│  │  ├─ whc_bridge_host_api.h
│  │  ├─ whc_bridge_host_demo.c
│  │  ├─ whc_bridge_host_intf.h
│  │  ├─ whc_bridge_host_netlink.c
│  │  ├─ whc_bridge_host_netlink.h
│  │  ├─ whc_bridge_host_pkt_rx.c
│  │  ├─ whc_bridge_host_tx.c
│  │  ├─ sdio_bridge
│  │  │  └─ Kbuild
│  │  ├─ spi_bridge
│  │  │  ├─ whc_bridge_host_spi.c.c
│  │  │  └─ Kbuild
│  ├─ common
│  │  ├─ autoconf.h
│  │  ├─ whc_host_event.h
│  │  ├─ whc_host_hci.c
│  │  ├─ whc_host_hci.h
│  │  ├─ whc_host_memory.c
│  │  ├─ whc_host_ops.c
│  │  ├─ whc_host_pkt_rx.c
│  │  ├─ whc_host_pkt_tx.c
│  │  ├─ whc_host_trx.h
│  │  ├─ netdev
│  │  │  ├─ whc_host_drv_probe.c
│  │  │  ├─ whc_host_drv_probe.h
│  │  │  ├─ whc_host_ethtool_ops.c
│  │  │  ├─ whc_host_ethtool_ops.h
│  │  │  ├─ whc_host_function.h
│  │  │  ├─ whc_host_linux.h
│  │  │  ├─ whc_host_netdev_ops.c
│  │  │  ├─ whc_host_netdev_ops.h
│  │  │  └─ whc_host_wiphy.h
│  │  ├─ sdio
│  │  │  ├─ whc_sdio_host.h
│  │  │  ├─ whc_sdio_host_drvio.c
│  │  │  ├─ whc_sdio_host_drvio.h
│  │  │  ├─ whc_sdio_host_fwdl.c
│  │  │  ├─ whc_sdio_host_init.c
│  │  │  ├─ whc_sdio_host_ops.c
│  │  │  ├─ whc_sdio_host_ops.h
│  │  │  ├─ whc_sdio_host_probe.c
│  │  │  └─ whc_sdio_host_reg.h
│  │  ├─ spi
│  │  │  ├─ whc_spi_host.h
│  │  │  ├─ whc_spi_host_ops.c
│  │  │  ├─ whc_spi_host_probe.c
│  │  │  └─ spidev-overlay.dts
│  │  └─ usb
│  │     ├─ whc_usb_host.h
│  │     ├─ whc_usb_host_ops.c
│  │     └─ whc_usb_host_probe.c
Wi-Fi Bridge Hardware Configuration
Interface Connections
The pin connections between Ameba and Raspberry Pi are as follows:
Interface |
SoC pin |
Function |
|---|---|---|
SDIO |
PB6 |
SDIO_DAT2 |
PB7 |
SDIO_DAT3 |
|
PB8 |
SDIO_CMD |
|
PB9 |
SDIO_CLK |
|
PB13 |
SDIO_DAT0 |
|
PB14 |
SDIO_DAT1 |
|
SPI |
PB24 |
SPI_MOSI |
PB25 |
SPI_MISO |
|
PB23 |
SPI_CLK |
|
PB26 |
SPI_CS |
|
PB8 |
DEV_TX_REQ |
|
PB9 |
DEV_READY |
|
UART |
PB4 |
UART_RX |
PB5 |
UART_TX |
Interface |
Raspberry Pi |
Function |
|---|---|---|
SDIO |
GPIO 26 |
SDIO_DAT2 |
GPIO 27 |
SDIO_DAT3 |
|
GPIO 23 |
SDIO_CMD |
|
GPIO 22 |
SDIO_CLK |
|
GPIO 24 |
SDIO_DAT0 |
|
GPIO 25 |
SDIO_DAT1 |
|
SPI |
GPIO 10 |
SPI_MOSI |
GPIO 9 |
SPI_MISO |
|
GPIO 11 |
SPI_CLK |
|
GPIO 8 |
SPI_CS |
|
GPIO 23 |
DEV_TX_REQ |
|
GPIO 22 |
DEV_READY |
|
UART |
GPIO 14 |
UART_TX |
GPIO 15 |
UART_RX |
Note
SPI DEV_TX_REQ: Ameba notifies Host of pending data transmission via rising edge on this pin
SPI DEV_READY: Ameba status indicator
High level (1): Device ready to receive data
Low level (0): Device busy (pause transmission)
Note
Default SDIO pins defined in Ameba SDK are used. Modify pinmux configuration in
SPDIO_Board_Init function()at:component/soc/amebadplus/hal/src/spdio_api.cHost-side SDIO interrupt requirements:
SDIO_DATA1 must be configured for SDIO function (not GPIO).
Switch to polling mode if Host doesn’t support SDIO interrupts.
SDIO Adapter Board
Realtek provides adapter board that enables convenient connection to mini SD card slots. It is recommended to use dedicated adapter boards for interfacing with SDIO pins.
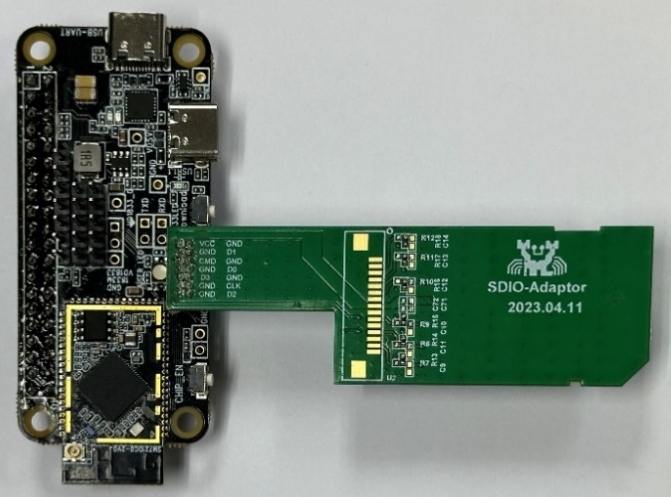
FullMAC SDIO adapter board (physical diagram)
Note
Realtek official adapter boards will be available soon. Currently request samples via <claire_wang@realsil.com.cn>.
Raspberry Pi Direct Connection
For high-speed scenarios, directly solder Ameba SDIO pins to Raspberry Pi GPIO.
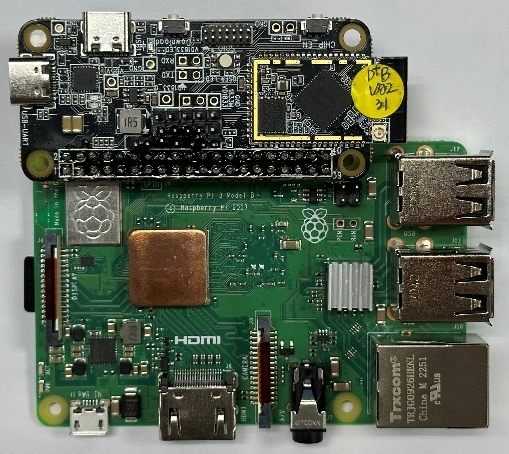
Ameba-Raspberry Pi direct connection diagram
Wi-Fi Bridge Porting Guide
Device Porting
Project Configuration
Execute in project directory (example path:
{SDK}/amebaxxx_gcc_project)./menuconfig.py
Select in order, then select the bridge mode and desired interface
Select :
(Top) -> CONFIG WHC INTF
----Configuration----
    WHC MODE (WHC_BRIDGE) --->
    HW INTERFACE --->
        (X) WHC_INTF_SDIO
        ( ) WHC_INTF_USB
        ( ) WHC_INTF_SPI
Select the :
(Top) -> CONFIG WHC INTF
----Configuration----
    WHC MODE (WHC_BRIDGE) --->
    HW INTERFACE --->
        ( ) WHC_INTF_SDIO
        ( ) WHC_INTF_USB
        (X) WHC_INTF_SPI
Firmware Compilation
Build the image with compile command:
./build.py
Image Flashing
Flash the generated image to development board using programming tool.
Host Porting
The current driver code has been validated on Linux Kernel v5.15. For compilation issues with other kernel versions, please contact <claire_wang@realsil.com.cn>.
Local SDK Environment Operations
Navigate to driver configuration directory
cd {SDK}/component/wifi/whc_host_linux
Execute interface deployment script (supporting SDIO/SPI etc.)
./fullmac_setup.sh sdio bridge
./fullmac_setup.sh spi bridge
Note
SPI initiates data transmission immediately after CS pin goes low and detects CLK. Potential edge cases may occur during bus contention: Testing shows adding 7μs delay between CS low and host CLK push ensures safe data transmission under busy conditions. Older SPI driver versions may lack
spi_delaysupport, requiring direct code modification to implement delay.Select target device model via interactive interface
Copy entire
whc_host_linuxdirectory to Linux host
Linux Host Operations
Install build toolchain
sudo apt-get install build-essential
Compile and load driver module
cd {driver_path}/whc_host_linux
make
sudo cp bridge/sdio_bridge/bridge_sdio.ko /lib/modules/$(uname -r)/
sudo systemctl stop dhcpcd.service
sudo depmod -a
sudo modprobe bridge_sdio
cd {driver_path}/whc_host_linux
make
sudo cp bridge/spi_bridge/bridge_spi.ko /lib/modules/$(uname -r)/
sudo systemctl stop dhcpcd.service
sudo depmod -a
sudo modprobe bridge_spi
Note
{driver_path}: Actual storage path of driver directory$(uname -r): Automatically detects current kernel version
Enable network interfaces
sudo ifconfig eth_sta0 up
sudo ifconfig eth_sta1 up
Verify interface status
ifconfig
Driver currently validated on Raspberry Pi 4 Model B (Broadcom BCM2711) with Raspberry Pi OS based on Debian 11 and Raspberry 5 (Broadcom BCM2712) with Raspberry Pi OS based on Debian 12.
Enable SDIO interface setup:
Raspberry Pi 4 or 4B:
# Add device tree overlay in /boot/config.txt
sudo sh -c 'echo "dtoverlay=sdio,poll_once=off" >> /boot/config.txt'
Raspberry Pi 5:
# Add device tree overlay in /boot/firmware/config.txt
sudo sh -c 'echo "dtoverlay=sdio,poll_once=off" >> /boot/firmware/config.txt'
Note
This configuration disables SDIO bus polling for better stability.
Subsequent steps align with Linux Environment Step 3 ~ 7
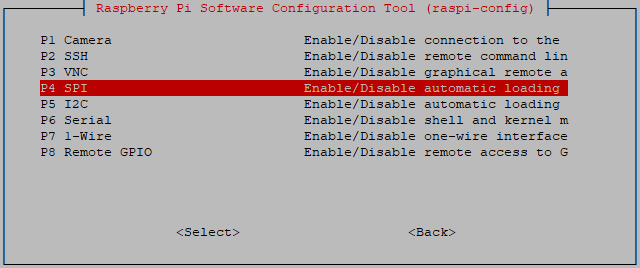
Enable SPI interface
sudo raspi-configSelect
Generate device tree overlay
sudo su
cd {driver_path}/whc_host_linux/common/spi
dtc -@ -Hepapr -I dts -O dtb -o inic_spidev.dtbo spidev-overlay.dts
cp inic_spidev.dtbo /boot/overlays/
dtoverlay inic_spidev
Subsequent steps align with Linux环境 steps
Wi-Fi Bridge API
API Documentation
# Kernel Layer APIs
whc_bridge_host_tx.c
whc_bridge_host_netlink.c

# User Space Layer APIs
whc_bridge_host_demo.c
whc_bridge_host_send_data_to_dev
void whc_bridge_host_send_data_to_dev(u8 *pbuf, u32 len, u32 with_txdesc);
Item |
Description |
|---|---|
Overview |
Sends data from the kernel to the device |
Parameters |
|
Return Value |
None |
whc_bridge_host_buf_rx_to_user
__attribute__((weak)) int whc_bridge_host_buf_rx_to_user(u8 *buf, u16 size);
Item |
Description |
|---|---|
Overview |
Receives data from the device to the host. This is a weak function, the SDK sends data from the kernel to user space. Customers not using the bridge app need to implement this function. |
Parameters |
|
Return Value |
Data reception result:
|
whc_bridge_host_api_send_nl_data
int whc_bridge_host_api_send_nl_data(uint8_t *buf, uint32_t buf_len);
Item |
Description |
|---|---|
Overview |
Sends data from user space to the kernel. which processes or forwards the data to the device based on the buffer content |
Parameters |
|
Return Value |
Data transmission result:
|
API Documentation
whc_bridge_dev_api.c
whc_bridge_dev_api_add_filter_node
void whc_bridge_dev_api_add_filter_node(struct whc_bridge_dev_pkt_filter *filter);
Item |
Description |
|---|---|
Functionality |
Add new filtering rule to the list |
Parameters |
filter: Pointer to whc_bridge_dev_pkt_filter structure (contains filter configuration) |
Return Value |
None |
whc_bridge_dev_api_get_filter_node
void whc_bridge_dev_api_get_filter_node(struct whc_bridge_dev_pkt_filter *filter, u32_t identity);
Item |
Description |
|---|---|
Functionality |
Query registered filter configuration by unique identifier |
Parameters |
|
Return Value |
None |
whc_bridge_dev_api_delete_filter_node
void whc_bridge_dev_api_delete_filter_node(u32_t identity);
Item |
Description |
|---|---|
Functionality |
Remove filter entry with specified ID from the list |
Parameters |
identity: Target filter entry identifier |
Return Value |
None |
whc_bridge_dev_api_set_host_state
void whc_bridge_dev_api_set_host_state(u8 state);
Item |
Description |
|---|---|
Functionality |
Update host’s data reception readiness status |
Parameters |
state: Status flag (WHC_BRIDGE_HOST_READY/WHC_BRIDGE_HOST_UNREADY) |
Return Value |
None |
whc_bridge_dev_api_get_host_rdy
u8 whc_bridge_dev_api_get_host_rdy(void);
Item |
Description |
|---|---|
Functionality |
Get current host data reception capability status |
Parameters |
None |
Return Value |
|
whc_bridge_dev_api_set_default_direction
void whc_bridge_dev_api_set_default_direction(u8 dir);
Item |
Description |
|---|---|
Functionality |
Define default forwarding behavior for unmatched packets |
Parameters |
dir: Forwarding direction enumeration
|
Return Value |
None |
whc_bridge_dev_api_get_default_direction
u8 whc_bridge_dev_api_get_default_direction(void);
Item |
Description |
|---|---|
Functionality |
Get currently active default forwarding policy |
Parameters |
None |
Return Value |
Currently active forwarding direction enumeration |
whc_bridge_dev_api_send_to_host
void whc_bridge_dev_api_send_to_host(u8 *data, u32 len);
Item |
Description |
|---|---|
Functionality |
Transmit data to host |
Parameters |
|
Return Value |
None |
Wi-Fi Bridge Linux Test
APP Architecture
The demo APP implements bidirectional control through two command categories:
Kernel-level Configuration
setmac: Configure device MAC addressnetifon: Activate network interface carrier
Device-level Control
getmac: Retrieve device MAC addressgetip: Fetch device IP configurationsetrdy: Notify device host status
The communication control flow is illustrated below:

Supported Commands
Command Syntax |
Description |
|---|---|
init |
Initialize Netlink communication channel |
getmac <device_idx> |
Retrieve device MAC address device_idx: The device port index, can only be 0 or 1.
|
getip <device_idx> |
Fetch network layer configuration device_idx: The device port index. It is the same to getmac. |
setrdy |
Notify device host readiness |
setmac <device_idx> <mac> |
Configure interface hardware address
|
netifon <device_idx> |
Activate physical layer carrier device_idx: The device port index. It is the same to getmac. |
Note
In our provided kernel driver, the carrier state of the network device is off by default, causing the device to not work properly. Use the netifon command to enable the carrier state, similar to calling the
netif_carrier_onfunction. Developers should callnetif_carrier_onto ensure proper device operation.In our provided kernel driver, the network device has a default MAC address of 00:00:00:00:00:00. Developers must set the correct physical address for the network device with the setmac command. Refer to the getmac and setmac commands for more details.
Build & Execution
# Navigate to bridge module
cd ${SDK}/component/wifi/whc_host_linux/bridge

# Build executable
make

# Run with privileges
sudo ./bridge
Testing Procedure
Initial Configuration
# Start console
> init
> getmac 0
00:0A:35:XX:XX:XX
> setmac 0 00:0A:35:11:22:33
> getip 0
Network Configuration
# Assign IP address
sudo ip addr add 192.168.1.100/24 dev eth_sta0
sudo ip link set eth_sta0 up
Data Path Validation
# Enable communication
> setrdy
> netifon 0

# Perform network test
ping 192.168.1.1
Validation Results
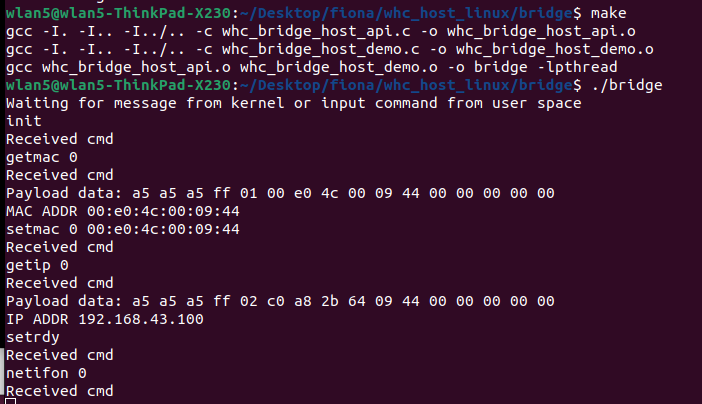
testapp control flow
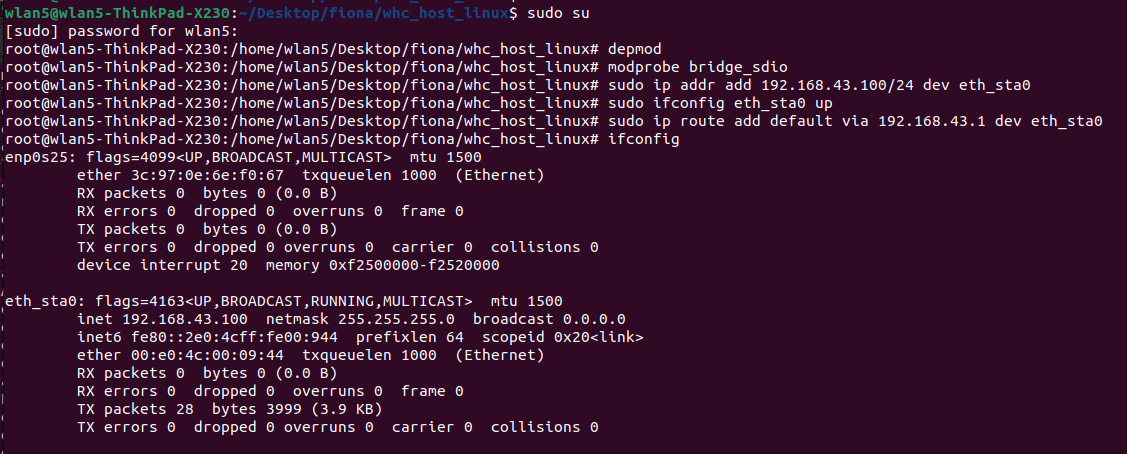
ifconfig status verification
Wi-Fi Bridge Throughput
Item |
Bandwidth 20M |
|---|---|
TCP Tx |
42Mbps |
TCP Rx |
42Mbps |
UDP Tx |
53Mbps |
UDP Rx |
52Mbps |
Test conditions:
Image2 running on PSRAM
AP: xiaomi AX3000
Host platform: Linux PC
Item |
Bandwidth 20M |
|---|---|
TCP Tx |
17.8Mbps |
TCP Rx |
17.5Mbps |
UDP Tx |
19.2Mbps |
UDP Rx |
18.9Mbps |
Test conditions:
Image2 running on FLASH
AP: Netcore AC1
Host platform: Raspberry 5, Linux 6.6.31+rpt-rpi-2712
Wi-Fi Bridge MP flow
There are two ways to implement the Wi-Fi MP (Mass Production) flow:
If the LOGUART on the WHC bridge device is pinned out, the Wi-Fi MP commands can be executed directly via the LOGUART.
If the LOGUART on the WHC bridge device is not pinned out, the Wi-Fi MP commands must be executed on the Linux host application via the bridge’s passthrough mechanism.
This approach is almost same to the standard FreeRTOS, refer to MP test.
To minimize interference from the WHC bridge, it is recommended to execute
whc_bridge_dev_api_set_host_state(WHC_BRIDGE_HOST_UNREADY).
The Wi-Fi Bridge API defines communication interfaces between the host application layer and the device. This suite of APIs helps customers to implement a system between host application layer and device. The communication flow is illustrated below:
On the host side, the system issues MP commands to the device.
The device system processes these commands by invoking
wext_private_command(), which analyzes the incoming instructions and executes them.The results or responses of these commands are stored in user_buf, a key input parameter of
wext_private_command().The device system transmits the contents of user_buf back to the host system, which subsequently displays the received information.
For detailed information on the MP commands, refer to MP test.